我在中文技術團隊觀察一直沒變的事情是,團隊中充滿了各式各樣優秀的同事,許多不乏都是在業界工作數年的工程師並且擁有豐富的經歷。有趣的是,時下的招聘政策也鼓勵許多剛畢業的學生加入 AWS Support 技術團隊,不時為團隊注入心血,使得整個團隊的組成十分多元。常常也有許多不同的新進同事從其他公司帶來不一樣的經驗和想法,甚至從原本使用 AWS 產品的客戶端變成解決問題的角色,都促使團隊中因為不同背景的工作者加入彼此交流而建立強大的人脈網路。
與全世界交流
Cloud Support Engineer 是一個全球化的團隊,工程師遍佈世界各地。當你身肩的責任和任務越多,自然越有更多機會與全世界的同事交流和執行專案。我個人曾經主持過跨三個時區的技術講座和訓練,不僅讓我實際應用專案管理的思維、訓練教學技能,更讓我進一步增加自己的能見度,並且實質提升團隊的技術職能,為團隊作出貢獻。
我認為這份工作與一般軟體開發最大不同的是,由於面對的是客戶的生產環境,Cloud Support Engineer 不時會有面對高壓的情境,例如功能故障、應用程式不工作的事件、系統崩潰等等。有時候客戶甚至會不斷的催促你盡快給予資訊,在這種情況下,你需要學會保持冷靜和集中注意力,同時,不能因客戶的情緒引領你往不正確的調查方向。
AWS Support 除了是一個跨國組成的團隊外,AWS 本身就提供了一個能夠讓你成長和曝光的平台。
身處中文 DevOps/Container 領域的技術團隊,我特別喜歡的一點是週遭的同事都非常支持且互相幫忙,並且在自己的職涯規劃上都很積極,不會只侷限在日常協助客戶解決單一 Support Case 的問題上。
即使每天日常解決多少個 Support Case (Ticket) 很重要,但更多得是其他面向的工作幫助你成長不同面向的技能。由於 AWS Support 密切的與不同產業的客戶合作,一個顯著的例子是透過客戶端面向的教育訓練機會幫助你成長,為不同規模的企業客戶分享有關 AWS 產品的使用建議和最佳實踐。
即使明白客戶常常不正確的選擇案例嚴重性,AWS Support 仍提供客戶最大的決定權。然而,這樣的現象某種程度上確實也導致工程資源被濫用。這就好比家喻戶曉的伊索寓言「狼來了」中描述的故事,當假警報一多,除了使得團隊無法正確區分真正受到生產環境影響的故障,更嚴重的是由於工程師都被一堆非故障影響的問題佔用,使得團隊工程師無法很好平衡不同問題之間的嚴重性,即時協助真正有環境受損影響的故障。
這個現象所帶來的影響更使得中文技術團隊必須大量的應付客戶這種短而快的回覆,而往往喪失能夠專注在技術問題上的時間。我看過許多新進人員因此無所適從,迫使被拉去處理大量需要短時間回應的案例,而無法真正的在單一案例中投入太多充分的時間進行調查:一下忙 A 案例,一下被抽去做 B 案例,或是手邊正在忙碌的事情、正在開的會不得不中斷去協助客戶,導致工作時間的碎片化。如果間接犧牲的是客戶長遠的服務品質,我相信整個市場型態有很多有待改進的空間。
很多應徵者把這份工作當成一般設定環境的 IT Helpdesk 或是只是單純的客戶服務職位,以為遵循 Runbook 就能解決大部分工作上的問題。但實際 AWS Support 做的工作與一般公司的 IT Support 會與想像中有蠻大的差異,即使工作上以 Ticket 形式與客戶互動,但角色仍偏向顧問服務性質,直接被拉進客戶會議直接一個人打十個討論問題更是你都可能會遇到的情境,我會建議在應徵這份工作前可以有個心理準備。
我常觀察到很多候選人即使在 IT 界從業多年,對於很多基本的知識都有很大的落差 (例如:我聽過有人說用 ping 可以測網站的 Port 80 看網站是不是掛了)。這種現象在只專注做開發相關工作的工程師身上尤為明顯 (嚴格上來說很多軟體工程師職位都是在「實作」,面對的很多產品規格都已經在現有的封裝函式庫或是公開解決方案的 API 上定義能夠直接套用,所以可能也沒太多機會思考這種這麼核心底層的問題)。
由於各個專業領域都有各自側重的項目,例如,專注 Database 專業的工程師跟專注 Linux 領域專業的工程師對於 Linux 知識的要求定義可能有所不同。可能 Database 專業的工程師具體了解 Linux 的基本原理、知道一些基本的指令和明白檔案系統、檔案權限管理、基本問題排查即可;但 Linux 專業的工程師可能就要非常了解 Linux process 運作、知道如何使用 Linux 的工具更加了解系統效能、知道 kernel dump 怎麼解讀、troubleshooting 等等知識。1
The AWS LoadBalancer resource created for your Ingress will be preserved. If migrating from<v1.1.3, a new AWS LoadBalancer resource will be created and the old AWS LoadBalancer will remain in the account. However, the old AWS LoadBalancer will not be used for the ingress resource.
# Upgrade and deploy to v1.1.9$ kubectl apply -f https://raw.githubusercontent.com/kubernetes-sigs/aws-alb-ingress-controller/v1.1.9/docs/examples/rbac-role.yaml
# Use kubectl and update the image to "docker.io/amazon/aws-alb-ingress-controller:v1.1.9"$ kubectl logs -n kube-system $(kubectl get po -n kube-system | egrep -o"alb-ingress[a-zA-Z0-9-]+")
W0130 13:05:04.770613 1 client_config.go:549] Neither --kubeconfig nor --master was specified. Using the inClusterConfig. This might not work.
-------------------------------------------------------------------------------
AWS ALB Ingress controller
Release: v1.1.9
Build: 6c19d2fb
Repository: https://github.com/kubernetes-sigs/aws-alb-ingress-controller.git
-------------------------------------------------------------------------------# ELB name doesn't change$ kubectl describe ing -n echoserver echoserver
Address: fe584233-echoserver-echose-XXXX-XXXXXXX.ap-northeast-1.elb.amazonaws.com
# Update the controller to v2# The old ALB Ingress controller has been uninstalled at this moment, and can see the ingress object is still preserved$ kubectl describe ing -n echoserver echoserver
Address: fe584233-echoserver-echose-XXXX-XXXXXXX.ap-northeast-1.elb.amazonaws.com
....
$ helm install aws-load-balancer-controller eks/aws-load-balancer-controller \-n kube-system \--setclusterName=eks \--set serviceAccount.create=false\--set serviceAccount.name =aws-load-balancer-controller
# Once v2 controller has been installed, the controller will update the ELB name$ kubectl describe ing -n echoserver echoserver
Address: k8s-echoserv-echoserv-XXXXXXXX-XXXXXXX.ap-northeast-1.elb.amazonaws.com
...
Events:
Type Reason Age From Message
-------------------------
Normal SuccessfullyReconciled 11s ingress Successfully reconciled
此時,舊有的 ELB 資源 (fe584233-echoserver-echose-XXXX-XXXXXXX.ap-northeast-1.elb.amazonaws.com ) 仍然存在,只是 AWS Load Balancer Controller 並未直接管理及操作該資源,並且不再執行註冊 Kubernetes Service 至相關 Target Group 資源。
func(t*defaultModelBuildTask)buildLoadBalancerName(_context.Context,schemeelbv2model.LoadBalancerScheme)(string,error){...iflen(explicitNames)==1{name,_:=explicitNames.PopAny()// The name of the loadbalancer can only have up to 32 charactersiflen(name)>32{return"",errors.New("load balancer name cannot be longer than 32 characters")}returnname,nil}iflen(explicitNames)>1{return"",errors.Errorf("conflicting load balancer name: %v",explicitNames)}uuidHash:=sha256.New()_,_=uuidHash.Write([]byte(t.clusterName))_,_=uuidHash.Write([]byte(t.ingGroup.ID.String()))_,_=uuidHash.Write([]byte(scheme))uuid:=hex.EncodeToString(uuidHash.Sum(nil))ift.ingGroup.ID.IsExplicit(){payload:=invalidLoadBalancerNamePattern.ReplaceAllString(t.ingGroup.ID.Name,"")returnfmt.Sprintf("k8s-%.17s-%.10s",payload,uuid),nil}sanitizedNamespace:=invalidLoadBalancerNamePattern.ReplaceAllString(t.ingGroup.ID.Namespace,"")sanitizedName:=invalidLoadBalancerNamePattern.ReplaceAllString(t.ingGroup.ID.Name,"")returnfmt.Sprintf("k8s-%.8s-%.8s-%.10s",sanitizedNamespace,sanitizedName,uuid),nil}
]]>Yang-Xin Cao (Eason Cao)[AWS][EKS] Zero downtime deployment(RollingUpdate) when using AWS Load Balancer Controller on Amazon EKS2022-06-01T00:00:00-05:002022-06-01T00:00:00-05:00https://easoncao.com/zero-downtime-deployment-when-using-alb-ingress-controller-on-amazon-eks-and-prevent-502-errorThis article is describing the thing you need to aware when using ALB Ingress Controller (AWS Load Balancer Controller) to do deployment and prevent 502 errors.
Overview
Kubernetes doesn’t involve the Application Load Balancer (ALB) deployment in the native implementation for using Kubernetes service object with type=LoadBalancer. Therefore, if you would like to expose your container service with Application Load Balancer (ALB) on EKS, it is recommended to integrate with AWS Load Balancer Controller (In the past, it was ALB Ingress Controller when it firstly initiated by CoreOS and Ticketmaster). This controller make it possible to manage have load balancers with Kubernetes deployment.
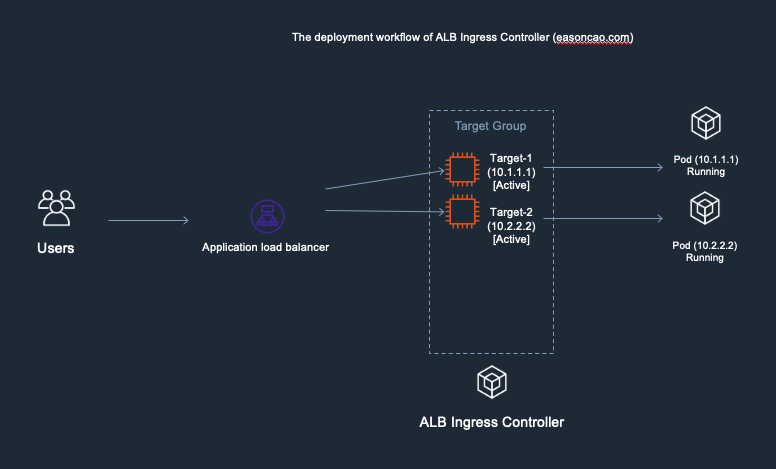
Below is showing an overview diagram that describing the controller workflow:
(1) The controller watches for ingress events from the API server.
(2) An ALB (ELBv2) is created in AWS for the new ingress resource. This ALB can be internet-facing or internal.
(3) Target Groups are created in AWS for each unique Kubernetes service described in the ingress resource.
(4) Listeners are created for every port detailed in your ingress resource annotations.
(5) Rules(ELB Listener Rules) are created for each path specified in your ingress resource. This ensures traffic to a specific path is routed to the correct Kubernetes Service.
How to deploy Kubernetes with AWS Load Balancer Controller?
Using Application Load Balancer as example, when running the controller, AWS Load Balancer Controller will be deployed as a Pod running on your worker node while continously monitor/watch your cluster state. Once there have any request for Ingress object creation, AWS Load Balancer Controller will help you to manage and create Application Load Balancer resource. Here is a part of example for v1.1.8 deployment manifest:
apiVersion:apps/v1kind:Deploymentmetadata:labels:app.kubernetes.io/name:alb-ingress-controllername:alb-ingress-controllernamespace:kube-systemspec:selector:matchLabels:app.kubernetes.io/name:alb-ingress-controllertemplate:metadata:labels:app.kubernetes.io/name:alb-ingress-controllerspec:containers:-name:alb-ingress-controllerargs:# Setting the ingress-class flag below ensures that only ingress resources with the# annotation kubernetes.io/ingress.class: "alb" are respected by the controller. You may# choose any class you'd like for this controller to respect.---ingress-class=alb# REQUIRED# Name of your cluster. Used when naming resources created# by the ALB Ingress Controller, providing distinction between# clusters.# - --cluster-name=devCluster# AWS VPC ID this ingress controller will use to create AWS resources.# If unspecified, it will be discovered from ec2metadata.# - --aws-vpc-id=vpc-xxxxxx# AWS region this ingress controller will operate in.# If unspecified, it will be discovered from ec2metadata.# List of regions: http://docs.aws.amazon.com/general/latest/gr/rande.html#vpc_region# - --aws-region=us-west-1image:docker.io/amazon/aws-alb-ingress-controller:v1.1.8serviceAccountName:alb-ingress-controller
The deployment basically will run a copy of ALB Ingress Controller (pod/alb-ingress-controller-xxxxxxxx-xxxxx) in kube-system:
NAMESPACE     NAME                                          READY   STATUS    RESTARTS   AGE
kube-system   pod/alb-ingress-controller-5fd8d5d894-8kf7z   1/1     Running   0          28s

NAMESPACE     NAME                                     READY   UP-TO-DATE   AVAILABLE   AGE
kube-system   deployment.apps/alb-ingress-controller   1/1     1            1           3m48s
Since v2, the controller added lots of different custom resources and enhancements. But the core deployment still preserve many thing that mentioned in this post. Depending on your environment, the default and suggested installation steps may also involve the configuration of IRSA (IAM Role for Service Account) to grant permission for the AWS Load Balancer Controller Pods in order to operate AWS resources (e.g. ELB), so it is recommended to take a look official documentation to help you quickly understand how to install the controller:
The file 2048-ingress.yaml is mentioning the annotations, spec in format that supported by ALB Ingress Controller can recognize (Before Kubernetes 1.18):
Before the IngressClass resource and ingressClassName field were added in Kubernetes 1.18, Ingress classes were specified with a kubernetes.io/ingress.class annotation on the Ingress. So right now, you should see the ingress specification will be defined as below if you are using controller version v2.x:
The ingress object will construct ELB Listeners according rules and forward the connection to the corresponding backend(serviceName), which match the group of service service-2048, any traffic match the rule /* will be routed to the group of selected Pods. In this case, Pods are exposed on the worker node based on type=NodePort:
Here is the definition of this Kubernetes service:
Zero downtime deployment is always a big challenge for DevOps/Operation team when running any kind of business. When you try to apply the controller as a solution to expose your service, it has a couple of things need to take care due to the behavior of Kubernetes, ALB and AWS Load Balancer Controller. To achieve zero downtime, you need to consider many perspectives, some new challenges will also popup when you would like to roll out the new deployment for your Pods with AWS Load Balancer Controller.
Let’s use the 2048 game as example to describe the scenario when you are trying to roll out a new version of your container application. In my environment, I have:
A Kubernetes service service/service-2048 using NodePort to expose the service
The deployment also have 5 copy of Pods for 2048 game, which is my backend application waiting for connections forwarding by Application Load Balancer (ALB)
NAMESPACE     NAME                                          READY   STATUS    RESTARTS   AGE
2048-game     pod/2048-deployment-58fb66554b-2f748          1/1     Running   0          53s
2048-game     pod/2048-deployment-58fb66554b-4hz5q          1/1     Running   0          53s
2048-game     pod/2048-deployment-58fb66554b-jdfps          1/1     Running   0          53s
2048-game     pod/2048-deployment-58fb66554b-rlpqm          1/1     Running   0          53s
2048-game     pod/2048-deployment-58fb66554b-s492n          1/1     Running   0          53s

NAMESPACE     NAME                   TYPE        CLUSTER-IP      EXTERNAL-IP   PORT(S)         AGE
2048-game     service/service-2048   NodePort    10.100.53.119   <none>        80:30337/TCP    52s

NAMESPACE     NAME                                     READY   UP-TO-DATE   AVAILABLE   AGE
2048-game     deployment.apps/2048-deployment          5/5     5            5           53s
And for sure, once the controller correctly set up and provision the ELB resource, the full domain of ELB also will be recorded to the Ingress object:
$ kubectl get ingress -n 2048-game
NAME           HOSTS   ADDRESS                                                                      PORTS   AGE
2048-ingress   *       xxxxxxxx-2048game-xxxxxxxx-xxxx-xxxxxxxxx.ap-northeast-1.elb.amazonaws.com   80      11m
I can use the DNS name as endpoint to visit my container service:
This application can be any kind of critical service you are running. As a administrator, SRE (Site Reliability Engineer), member of operation team or a DevOps engineer, the goal and your duty is: we always try to ensure the service can run properly without any issue and no interruption (Sometimes it means good sleep). That’s why people really gets hand dirty and maintain the regular operation usually don’t like to adopt service change, because it generally means unstable.
No matter you don’t want to change, with any new business requests, you still can face the challenges like: your developers are saying that “Oh! we need to upgrade the application”, “we are going to roll out a bug fix”, “the new feature is going to be online”, no one can one hundred percent guarantees the service can run properly if any changes applied, because system usually has its limitation and trade-off. Any service downtime can lead anyone of stakeholders(users, operation team or leadership) unhappy.
However, the question is that can we better to address these problem once we know the limitation and its behavior? Some people in Taiwan will also consider to put Kuai Kuai on the workstation because they believe it can make service happy, but I am not very obsessed with this method, so in the following section I will try to walk through more realistic logic and phenomena by using the 2048 game as my sample service.
I am going to use a simple loop trick to continously access my service via the endpoint xxxxxxxx-2048game-xxxxxxxx-xxxx-xxxxxxxxx.ap-northeast-1.elb.amazonaws.com to demonstrate a scenario: This is a popular web service and we always have customer need to access it. (e.g. social media platform, bitcoin trading platform or any else, we basically have zero tolerance for any service downtime as it can impact our revenue.), as below:
Meanwhile, I am using RollingUpdate strategy in my Kubernetes deployment strategy with maxUnavailable=25%, which means, when Kubernetes need to update or patch(Like update the image or environment variables), the maximum number of unavailable Pods cannot exceed over 25% as well as it ensures that at least 75% of the desired number of Pods are up (only replace 1-2 Pods if I have 5 copies at the same time):
Scenario: Rolling the new container image to existing container application with potential service downtime
When rolling the new version of my container application (for example, I update my deployment by replacing the container image with the new image nginx), it potentially can have a period of time that can return HTTP Status Code 502 error in my few hits:
The HTTP 502 Error response from ELB during the rolling update deployment (instance mode)
If you are specifying the controller to use instance mode to register targets(Pods) to your ELB Target Group, it will use worker nodes’ instance ID and expose your service in that ELB target group with Kubernetes NodePort. In this case, the traffic will follow the Kubernetes networking design to do second tier of transmission according to externalTrafficPolicy defined in the Kubernetes Service object (No matter using externalTrafficPolicy=Cluster or externalTrafficPolicy=Local).
Due to the controller only care about to register Worker Node to the ELB target group, so if the scenario doesn’t involve the worker node replacement, the case basically have miniumun even no downtime(expect that it is rare to have downtime if the Kubernetes can perfectly handle the traffic forwarding); however, this is not how real world operate, few seconds downtime still can happen potentially due to the workflow below:
This is the general workflow when the client reach out to the service endpoint (ELB) and how was traffic goes
Client ----> ELB ----> Worker Node (iptables) / In this step it might be forwarded to other Worker Node ----> Pod
So, in these cases, you can see the downtime:
(1) The client established the connection with ELB, ELB is trying to forward the request to the backend (the Worker Node), but the Worker Node is not ready to serve the Pod.
(2) Follow the iptables rules, the traffic be forwarded to the Pod just terminated due to RollingUpdate (Or the Pod just got the in-flight reqeust but immediately need to be terminated, the Pod flip to Terminating state. It haven’t response back yet, caused the ELB doesn’t get the response from Pod.)
(3) ELB established connection with the Worker Node-1, once the packet enter into the Worker Node-1, it follows the iptables then forward it to the Pod running on Worker Node-2 (jump out the current worker node), however, the Worker Node-2 just got terminated due to auto scaling strategy or any replacement due to upgrade, caused the connection lost.
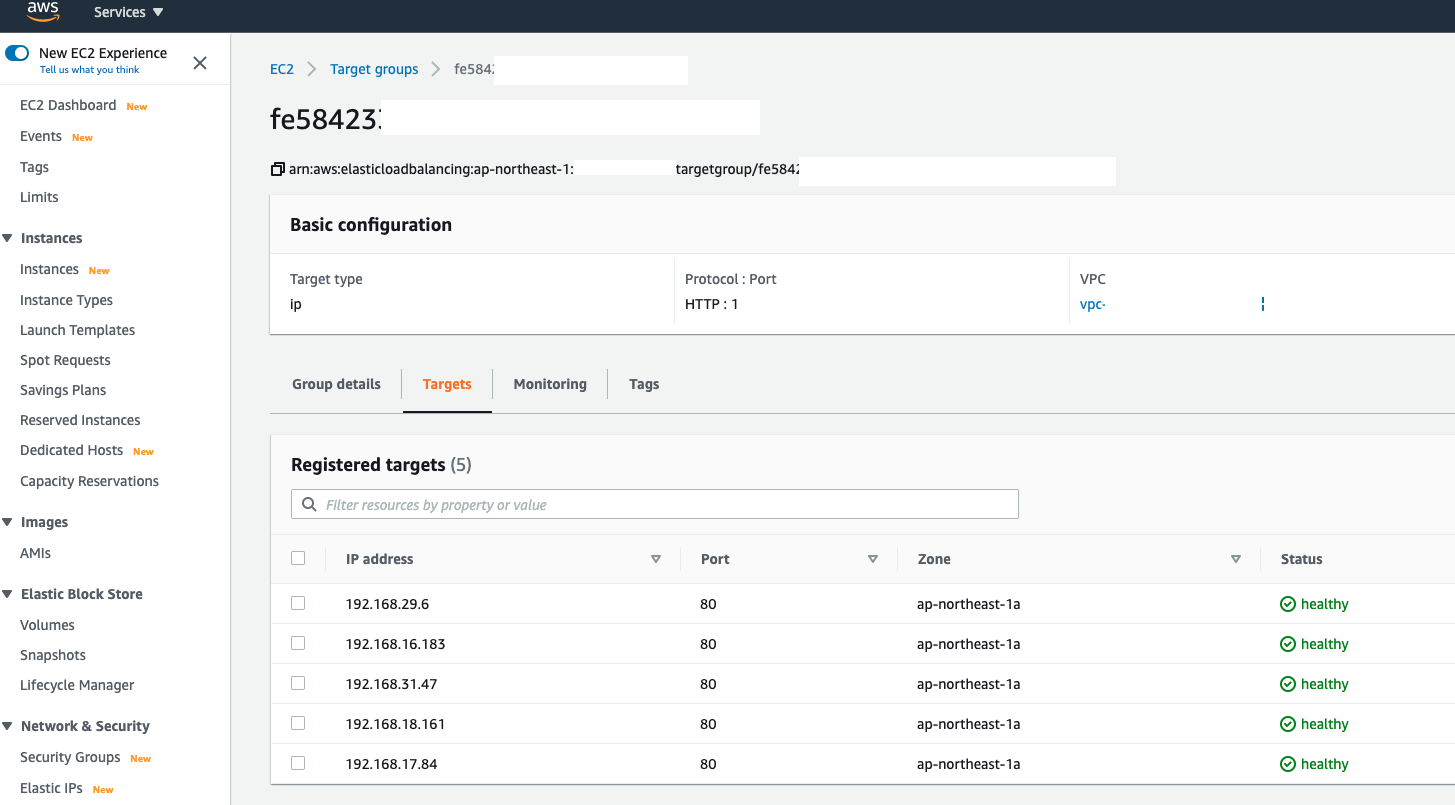
Let’s say if you try to remove the encapsulation layer of the Kubernetes networking design and make thing more easier based on the AWS supported CNI Plugin (Only rely on the ELB to forward the traffic to the Pod directly by using IP mode with annotation setting alb.ingress.kubernetes.io/target-type: ip in my Ingress object), you can see the downtime more obvious when Pod doing RollingUpdate. That’s because not only the problem we mentioned the issues in case (1)/(2)/(3), but also there has different topic on the behavior of the controller need to be covered if the question comes to zero downtime deployment:
Here is an example by using IP mode (alb.ingress.kubernetes.io/target-type: ip) as resgistration type to route traffic directly to the Pod IP
An example when using IP mode in AWS Load Balancer Controller - Can see my Pods all are registering with Pod owns IP address
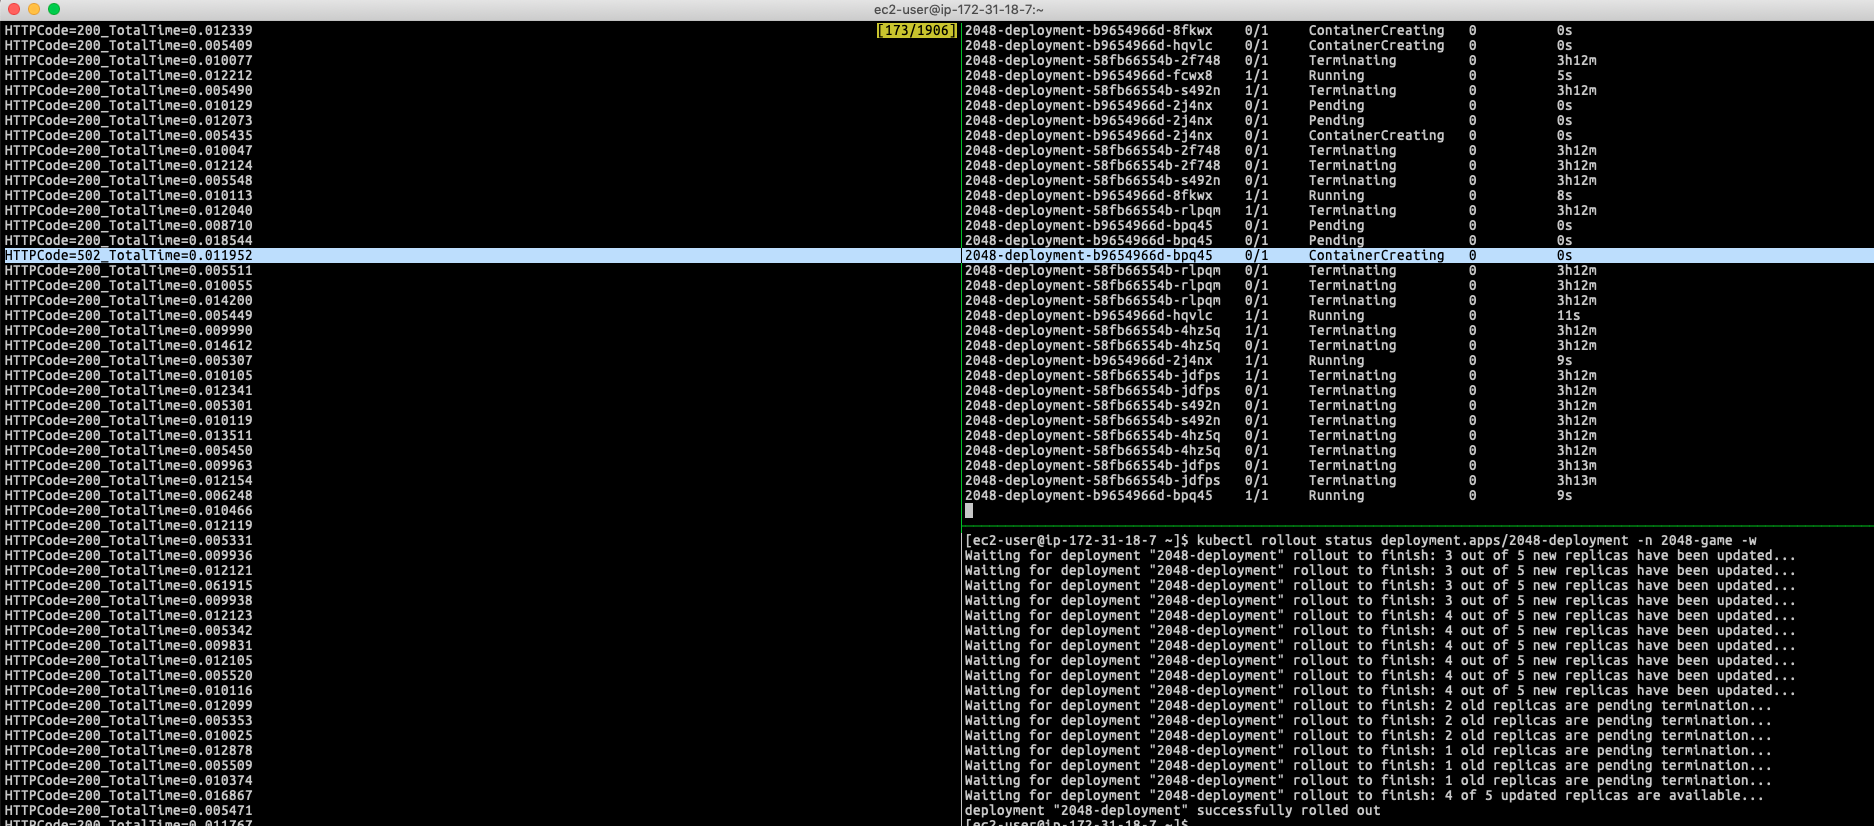
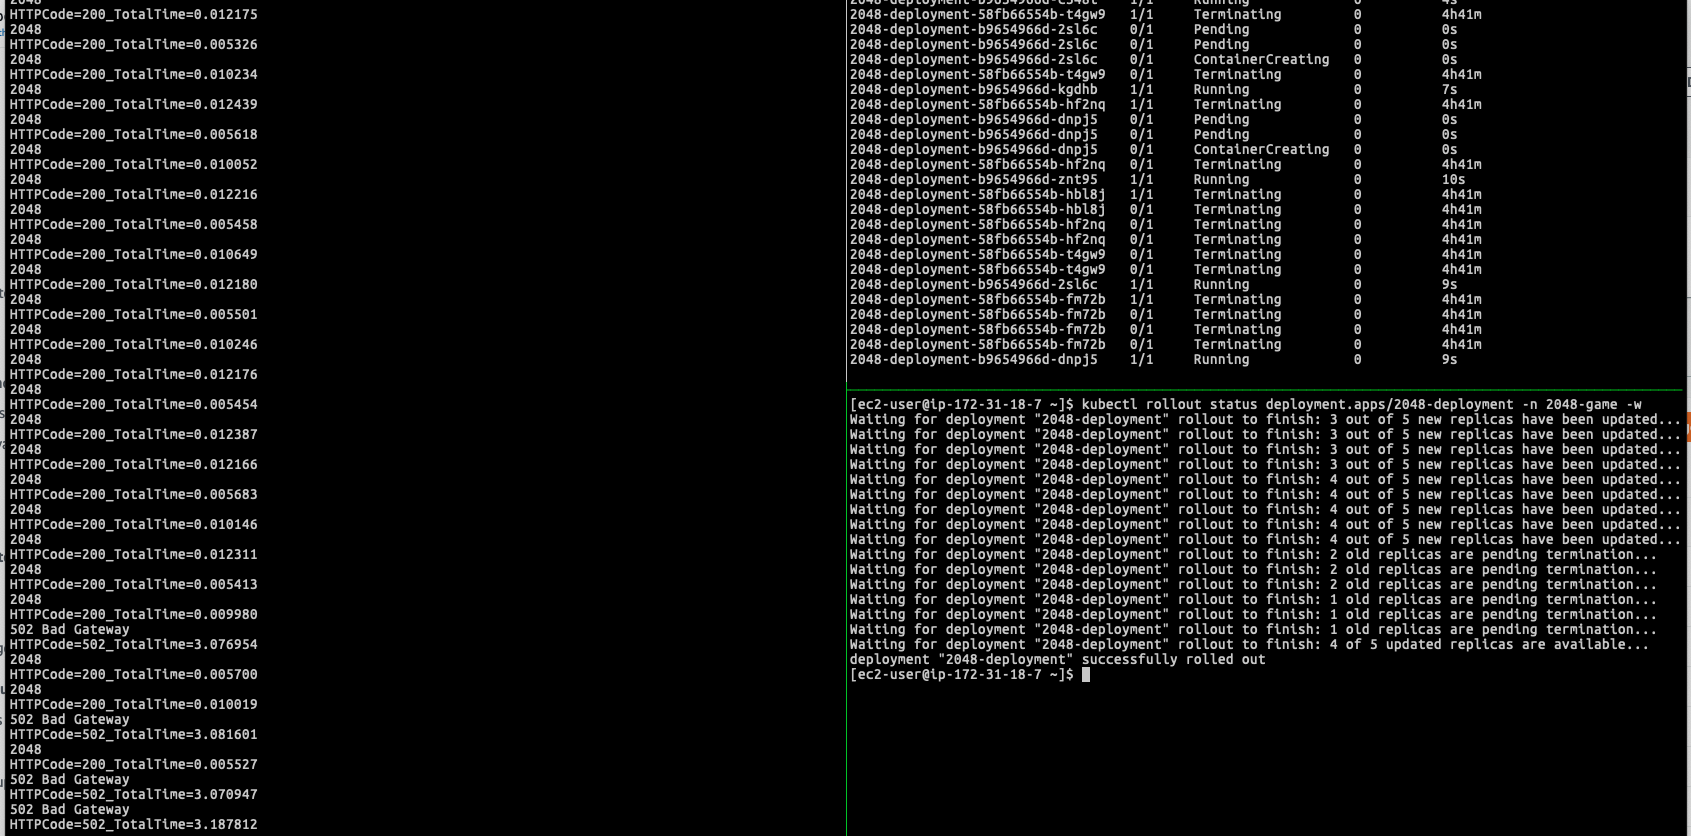
Again follow the issue we mentioned (1) (2) (3), when doing the rolling update (I was replacing the image again in IP mode), similar problem can be observed. Potentially, you can have 10-15 seconds even longer downtime can be noticed if you are doing the same lab:
The HTTP 502 Error response from ELB during the rolling update deployment (IP mode)
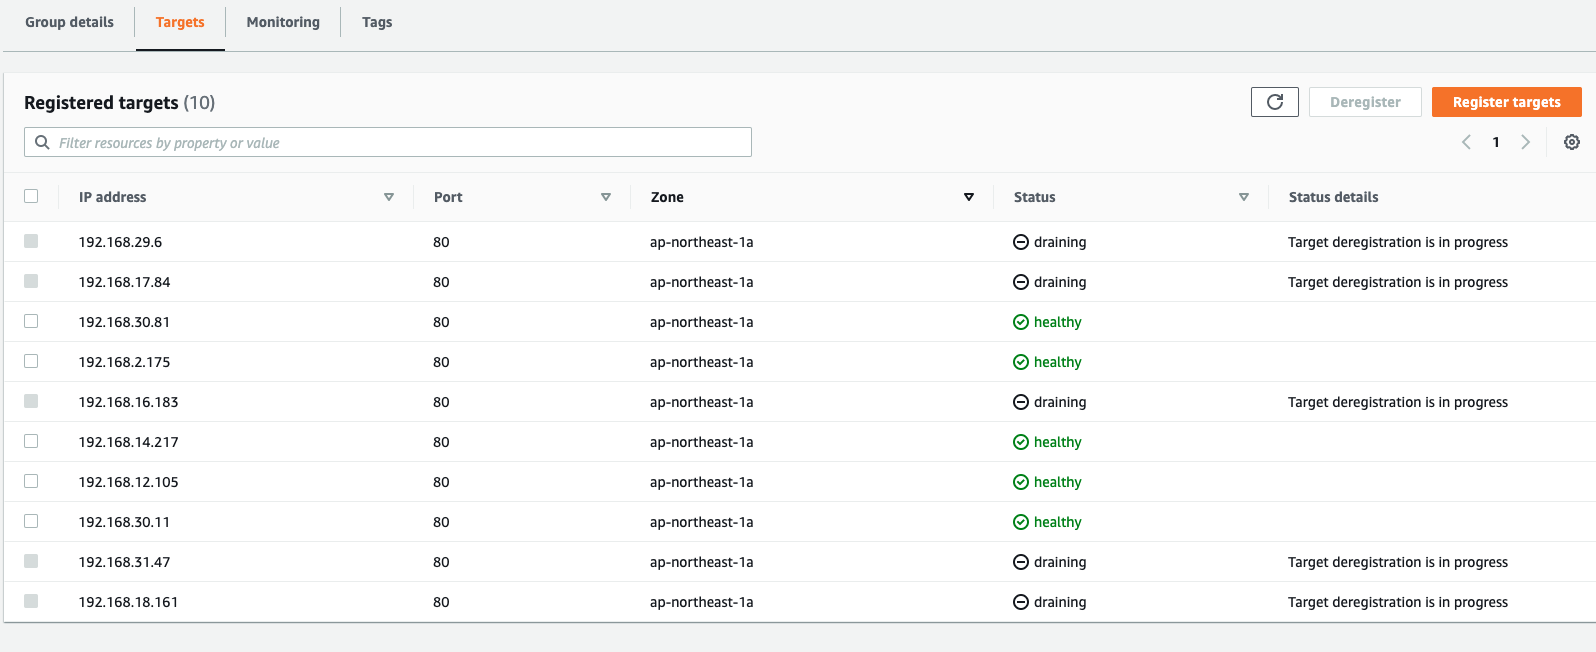
When Kubernetes is rolling the deployment, in the target group, you will see AWS Load Balancer Controller was issuing old targets draining process(Old Pods) in the meantime
Old targets were going to be draining state in target group
However, you still can see HTTP 502/504 errors exceed 3-10 seconds for a single requset
HTTPCode=200_TotalTime=0.005413
2048
HTTPCode=200_TotalTime=0.009980
502 Bad Gateway
HTTPCode=502_TotalTime=3.076954
2048
HTTPCode=200_TotalTime=0.005700
2048
HTTPCode=200_TotalTime=0.010019
502 Bad Gateway
HTTPCode=502_TotalTime=3.081601
2048
HTTPCode=200_TotalTime=0.005527
502 Bad Gateway
HTTPCode=502_TotalTime=3.070947
502 Bad Gateway
HTTPCode=502_TotalTime=3.187812
504 Gateway Time-out
HTTPCode=504_TotalTime=10.006324
Welcome to nginx!
HTTPCode=200_TotalTime=0.011838
Welcome to nginx!
The issue and the workflow of the AWS Load Balancer Controller
Let’s use this scenario as it is a edge problem we need to consider for most use case. The issue generally is bringing out the core topic we want to address and giving a good entry point to dive deep into the workflow between the Kubernetes, AWS Load Balancer Controller and the ELB, which can lead HTTP status code 502/503(5xx) erros during deployment when having Pod termination.
Before diving into it, we need to know when a pod is being replaced, AWS Load Balancer Controller will register the new pod in the target group and removes the old Pods. However, at the same time:
For the the new Pods, the target is in initial state, until it pass the defined health check threshold (ALB health check)
For the old Pods is remaining as draining state, until it completes draining action for the in-flight connection, or reaching out the Deregistration delay defined in the target group.
Which result in the service to be unavailable and return HTTP 502.
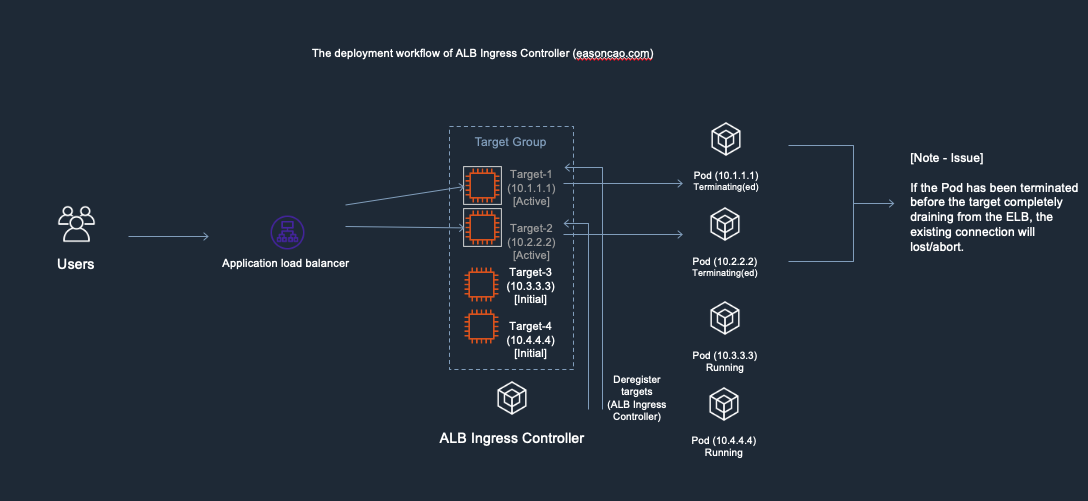
To better understand that, I made the following diagrams. It might be helpful to you understanding the workflow:
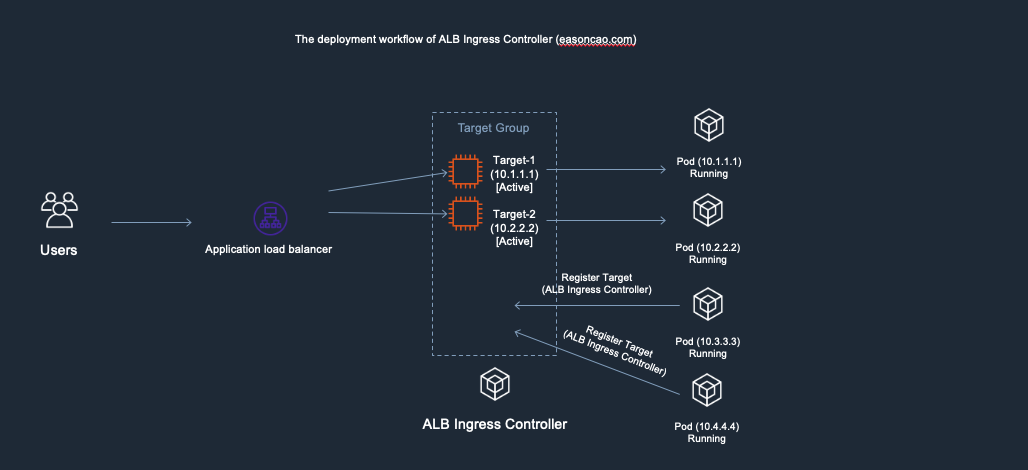
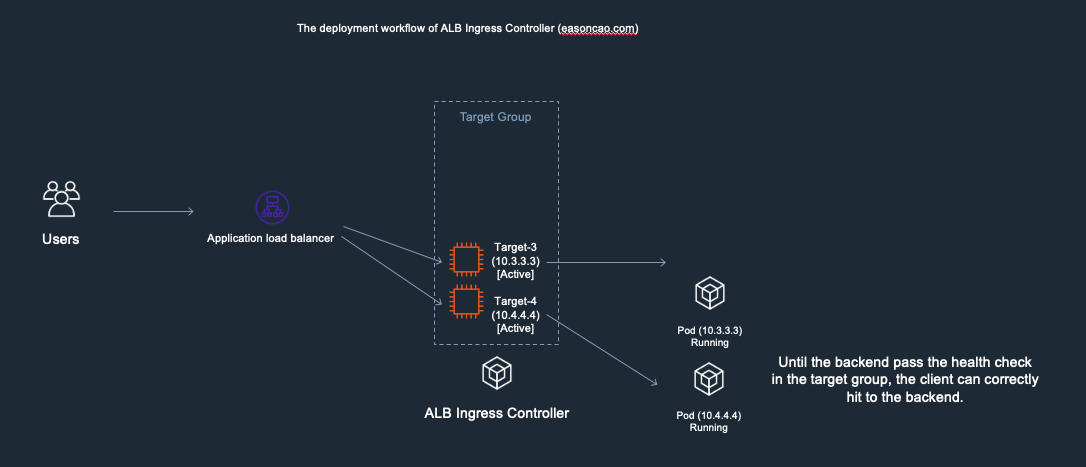
1) In the diagram, I used the following IP addresses to remark and help you recognize new/old Pods. Here is the initial deployment.
Old Pods: Target-1(Private IP: 10.1.1.1), Target-2(Private IP: 10.2.2.2)
New Pods: Target-3(Private IP: 10.3.3.3), Target-4(Private IP: 10.4.4.4)
Deployment workflow of AWS Load Balancer Controller - 1. the initial deployment
2) At this stage, I was doing container image update and start rolling out the new copies of Pods. In the meantime, the controller will make RegisterTarget API call to ELB on behalf of the Kubernetes.
Deployment workflow of AWS Load Balancer Controller - 2. start rolling out the new copies of Pods and AWS Load Balancer Controller is going to issue RegisterTarget API call
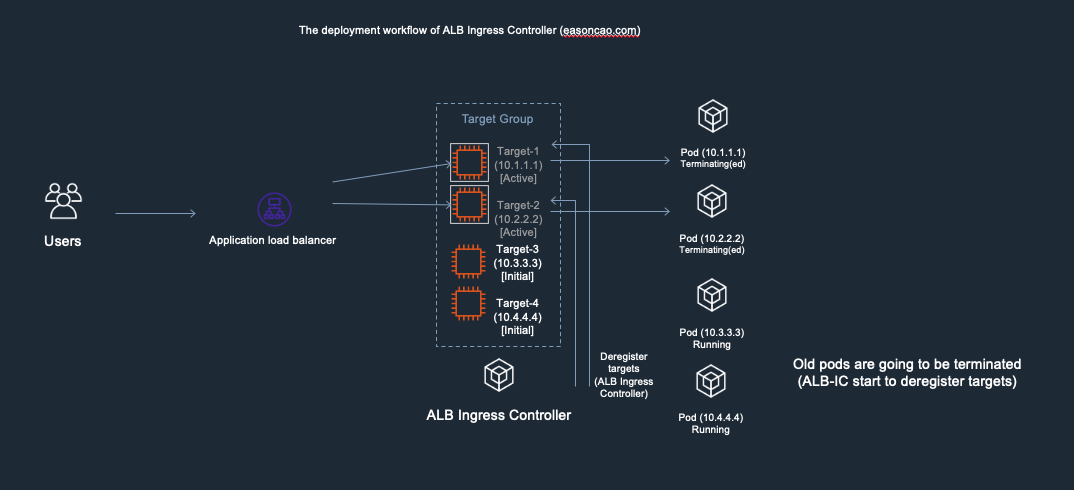
3) Meanwhile, the DeregisterTarget API will be called by AWS Load Balancer Controller and new targets are in initial state.
Deployment workflow of AWS Load Balancer Controller - 3. AWS Load Balancer Controller start to dereigster old targets on ELB Target Group
4) At this stage, anything could happen to cause service outage. Because the DeregisterTarget API call might take some time to process, but, Kubernetes doesn’t have any design to monitor the current state of the ELB Target Group, it only care about rolling the new version of Pods and terminate old one.
In this case, if the Pod got terminated by Kubernetes but Target-1 or Target-2 are still leaving in the ELB Target Group as Active/Healthy state (It need to wait few seconds to be Unhealthy once it reach out to the threshold of ELB HTTP health check), result in the ELB cannot forward the front-end request to the backend correctly.
Deployment workflow of AWS Load Balancer Controller - 4. Note: issue cause by inconsistent state between Kubernetes and ELB
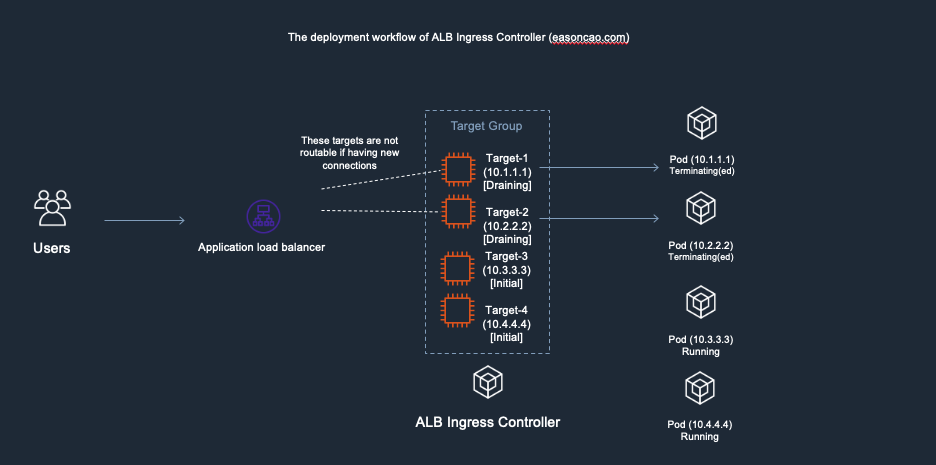
5) ELB received the DeregisterTarget request. So the ELB Target Group will start to perform connection draining(set old targets as draining), and mark the Target-1/Target-2 as draining state, any new connection won’t be routed to these old targets.
Deployment workflow of AWS Load Balancer Controller - 5. ELB start to perform connection draining for old targets
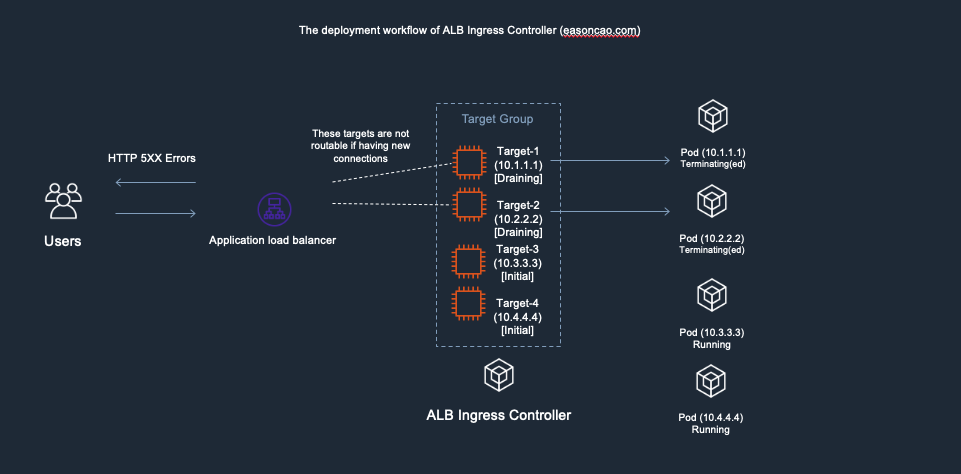
6) However, here brings another issue: if the new targets (Target-3 and Target-4) are still working on passing the health check of ELB(Currently those are in Initial state), there has no backend can provide service at this moment, which can cause the ELB only can return HTTTP 5XX status code
Deployment workflow - 6. ELB response HTTP 5XX error due to no healthy targets in can provide service
7) Until the new Pods is in Running state as well as can react the health check reqeust from ELB through HTTP/HTTPS protocol, the ELB end up mark the targets as Active/Healthy and the service become available
Deployment workflow - 7. The service need to wait a period to recover until new targets passed the ELB health check
How to resolve the issue and meet zero-downtime?
Factor-1: Pod Readiness Gates
Since version v1.1.6, AWS Load Balancer Controller (ALB Ingress Controller) introduced Pod readiness gates. This feature can monitor the rolling deployment state and trigger the deployment pause due to any unexpected issue(such as: getting timeout error for AWS APIs), which guarantees you always have Pods in the Target Group even having issue on calling ELB APIs when doing rolling update.
ALB Ingress Controller 1.x (Legacy)
As mentioned in the previous workflow, obviously, if you would like to prevent the downtime, it is required to use several workarounds to ensure the Pod state consistency between ALB, ALB Ingress Controller and Kubernetes.
In the past, the readiness gate can be configured with legacy (version 1) by using the following pod spec. Here is an example to add a readiness gate with conditionType: target-health.alb.ingress.k8s.aws/<ingress name>_<service name>_<service port>
(As it might be changed afterward, for more detail, please refer to the documentation as mentioned in the AWS Load Balancer Controller project on GitHub):
For now, if you are using controller later than v2, the readiness gate configuration can be automatically injected to the pod spec by defining the label elbv2.k8s.aws/pod-readiness-gate-inject: enabled to your Kubernetes namespace.
So defining legacy fields readinessGates and conditionType are not required if you are using controller later than v2.0. If you have a pod spec with legacy readiness gate configuration, ensure you label the namespace and create the Service/Ingress objects before applying the pod/deployment manifest. The controller will remove all legacy readiness-gate configuration and add new ones during pod creation.
Factor-2: Graceful shutdown your applications
For existing connections(As mentioned in the workflow-4), the case is involving the gracefully shutdown/termination handling in Kubernetes. Therefore, it is requires to use the method provided by Kubernetes.
You can use Pod Lifecycle with preStop hook and make some pause(like using sleep command) for Pod termination. This trick ensures ALB can have some time to completely remove old targets on Target Group (It is recommended to adjust longer based on your Deregistration delay):
Note: If a container has a preStop hook configured, that runs before the container enters the Terminated state. Also, if the preStop hook needs longer to complete than the default grace period allows, you must modify terminationGracePeriodSeconds to suit this.
An example to achieve zero downtime when doing rolling update after applying methods above
First apply the label to the namespace so the controller can automatically inject the readiness gate:
apiVersion:apps/v1kind:Deploymentmetadata:name:"2048-deployment"namespace:"2048-game"spec:selector:matchLabels:app:"2048"replicas:5template:metadata:labels:app:"2048"spec:# This would be optional if you are using controller after v2.xreadinessGates:-conditionType:target-health.alb.ingress.k8s.aws/2048-ingress_service-2048_80terminationGracePeriodSeconds:70containers:-image:alexwhen/docker-2048imagePullPolicy:Alwaysname:"2048"ports:-containerPort:80lifecycle:preStop:exec:command:["/bin/sh","-c","sleep40"]
Here is an example after following the practice I was getting a try. The deployment will apply the feature and can see the status of the readiness gates:
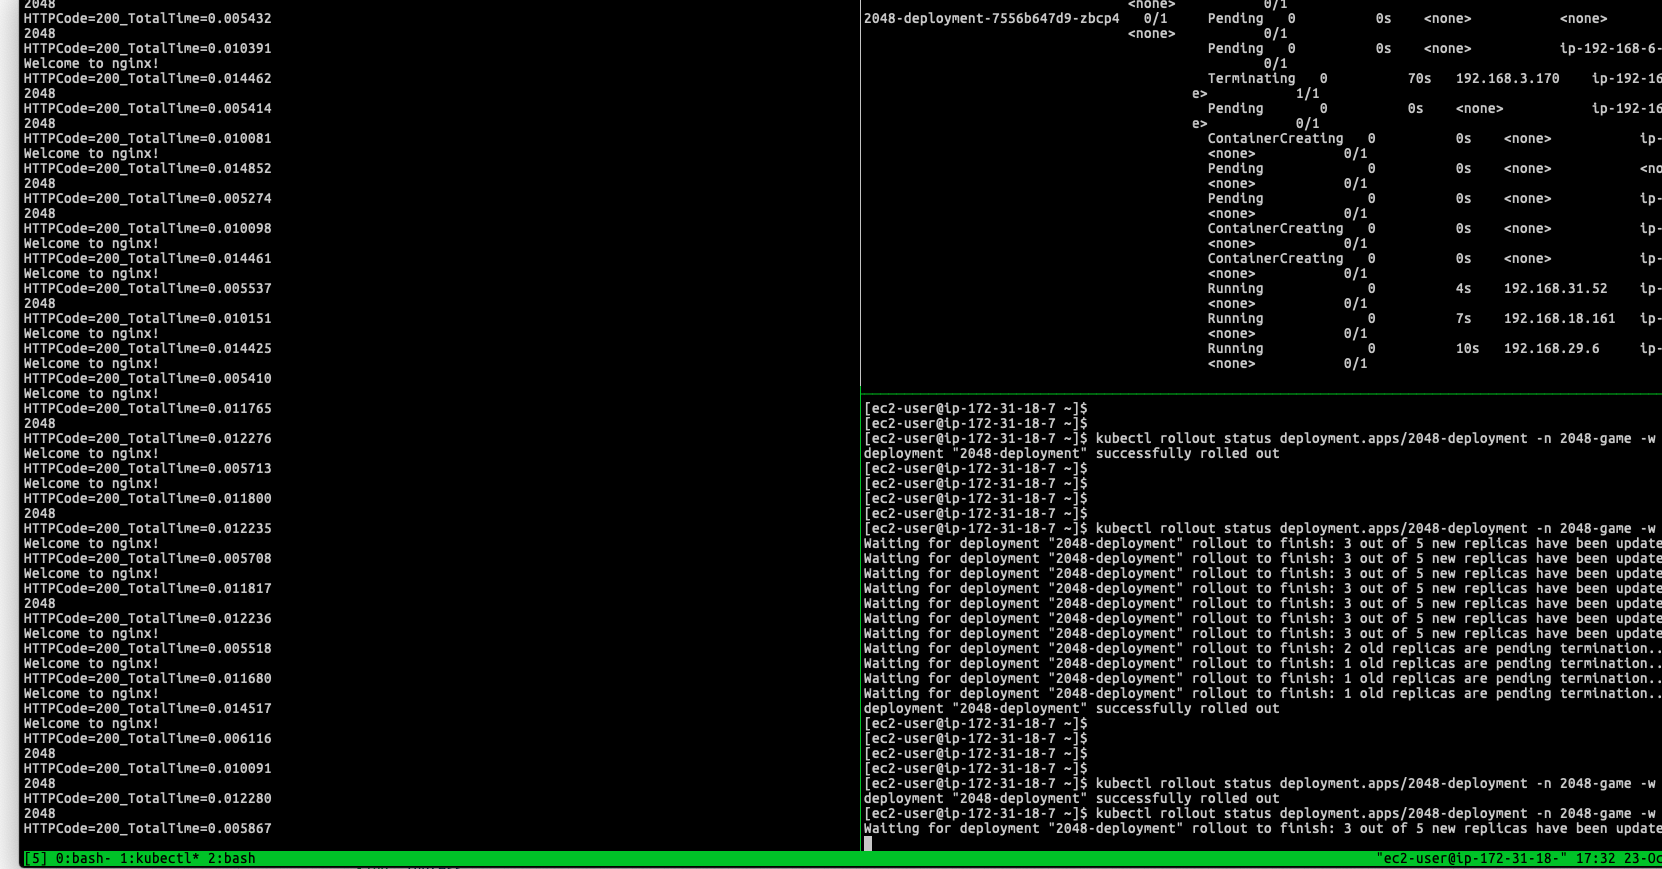
Once rolling the new version of the container image, the deployment goes smoothly and prevent the downtime issue as mentioned in previous paragraphs:
Zero downtime with AWS Load Balancer Controller - Can see the targets are gracefully replaced when the Kubernetes is doing rolling update
In my scenario, the Kubernetes need to take at least 40 seconds termination period for single Pod, so the old targets are gradually moved out instead of remove all of them at once within few seconds, until entire target group only exists new targets.
Therefore, you probably also need to notice the Deregistration delay defined in your ELB Target Group, which can be updated through the annotation:
In this case, it is recommended to be less than 40 seconds so ELB can drain your old targets before the Pod completely shutdown.
With the configuration, client can get normal responses from old Pods/existing connection during the deployment:
HTTPCode=200_TotalTime=0.012028
2048
HTTPCode=200_TotalTime=0.005383
2048
HTTPCode=200_TotalTime=0.010174
2048
HTTPCode=200_TotalTime=0.012233
Welcome to nginx!
HTTPCode=200_TotalTime=0.007116
2048
HTTPCode=200_TotalTime=0.010090
2048
HTTPCode=200_TotalTime=0.012201
2048
HTTPCode=200_TotalTime=0.005532
2048
HTTPCode=200_TotalTime=0.010107
2048
HTTPCode=200_TotalTime=0.012163
Welcome to nginx!
HTTPCode=200_TotalTime=0.005452
Welcome to nginx!
HTTPCode=200_TotalTime=0.009950
2048
HTTPCode=200_TotalTime=0.012082
Welcome to nginx!
HTTPCode=200_TotalTime=0.005349
2048
HTTPCode=200_TotalTime=0.010142
2048
HTTPCode=200_TotalTime=0.012143
2048
HTTPCode=200_TotalTime=0.005507

...
HTTPCode=200_TotalTime=0.012149
Welcome to nginx!
HTTPCode=200_TotalTime=0.005364
Welcome to nginx!
HTTPCode=200_TotalTime=0.010021
Welcome to nginx!
HTTPCode=200_TotalTime=0.012092
Welcome to nginx!
HTTPCode=200_TotalTime=0.005463
Welcome to nginx!
HTTPCode=200_TotalTime=0.010136
Welcome to nginx!
This is the practice in case having AWS Load Balancer Controller for doing graceful deployment with RollingUpdate. However, it is another big topic need to be discussed regarding what type of the application when rolling the update. Because other type of applications need to establish long connection with the ELB or have requirement for considering persistence data need to be stored on the backend. All these things can bring out other issues we need to talk about.
But in summarize, with the deployment strategy above, it is also recommended to design the client/backend application as stateless, implement retry and fault-tolerance. These mothod usually help to reduce the customer complain and provide better user experience for most common use case.
Conclusion
Due to the current design of Kubernetes, it is involving the state inconsistent issue when you are exposing the service with Application Load Balancer. Therefore, in this article, I mentioned the potential issue when doing rolling update in the scenario having container service integrating with the AWS Load Balancer Controller (ALB Ingress Controller).
Even the technology is always in revolution, I am still willing to help people better handle the deployment strategy. I used a couple of hours to draft this content and tried to cover several major issues, metioned things you might need to aware, break down the entire workflow and shared few practical suggestions that can be achieved by using AWS Load Balancer Controller in order to meet the goal when doing zero downtime deployment.
The article was written based on my own experience (Of course many communications back and forth with different customers using AWS), it might not be perfect but I hope it is helpful to you. For sure, if you find any typo or have any suggestions, please feel free and leave comment below.
是一種無伺服器的運算服務,可讓您執行程式但不必佈建或管理伺服器、建立工作負載感知叢集擴展邏輯、維護事件整合或管理執行階段。使用 Lambda,您可以透過虛擬方式執行任何類型的應用程式或後端服務,全部無需管理。在這篇內容中,我使用了 Lambda Function 以推送訊息至 Amazon SNS 以發佈檔案更新。 Amazon CloudWatch
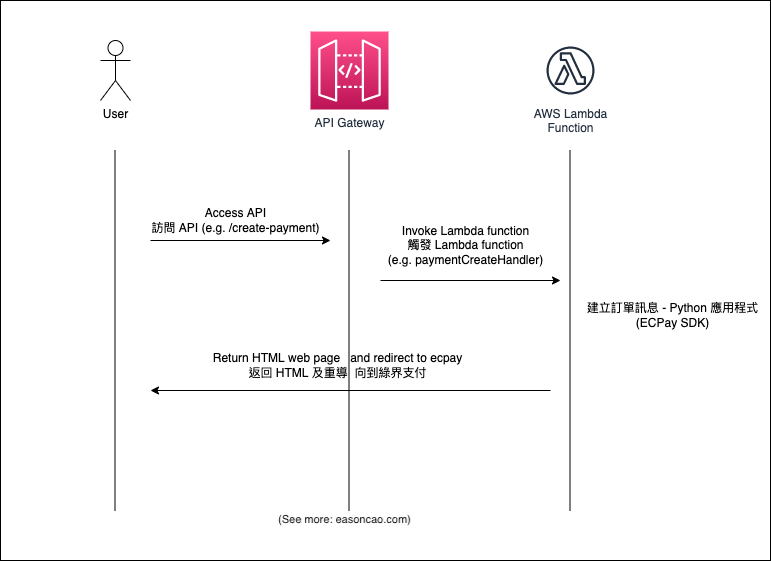
API Gateway
為 AWS 提供的託管服務,可以讓開發人員輕鬆地建立、發佈、維護、監控和保護任何規模的 API。API 可作為應用程式的「前門」,以便從後端服務存取資料、商業邏輯或功能。使用 API Gateway 時,您可以建立 RESTful API 等應用程式。API Gateway 支援無伺服器工作負載和 Web 應用程式。API Gateway 可以用以負責處理有關接受和處理多達數十萬個並行 API 呼叫的所有工作,包括流量管理、CORS 支援、授權和存取控制。API Gateway 沒有最低費用或啟動成本。您要為收到的 API 呼叫和資料傳輸量支付費用。
]]>Yang-Xin Cao (Eason Cao)[AWS][EKS] Best practice for load balancing - 3. what controller should I use2022-04-08T00:00:00-05:002022-04-08T00:00:00-05:00https://easoncao.com/eks-best-practice-load-balancing-3-enThis article is sharing the best practice for doing load balancing on Amazon EKS, learn what is advantage and disadvantage of using different controller. We will discuss what controller should you use.
Compare different controller options
Here are some common load balancing solutions that can be applied on Amazon EKS:
Kubernetes in-tree load balancer controller
This is the easiest way to provision your Elastic Load Balancer resource, which could be done by using default Kubernetes service deployment with type: LoadBalancer. In most case, the in-tree controller can quickly spin up the load balancer for experiment purpose; or, offers production workload.
However, you need to aware the problem as we mentioned in the previous posts 12 because it generally can add a hop for your load balancing behavior on AWS and also can increase the complexity for your traffic.
In addition, you need to aware this method only applies for creating Classic Load Balancer and Network Load Balancer (by using annotation 3).
nginx ingress controller
If you are using nginx Ingress controller in AWS, it will deploy Network load balancer (NLB) to expose the NGINX Ingress controller behind a Service of type=LoadBalancer. Here is an example for deploying Kubernetes service of nginx Ingress controller 1.1.3:
Guess what, yes, it is still can rely on the in-tree controller. On the other hand, the problem we were mentioning can persist. It can be hard to expect which Pods will receive the traffic; however, the main issue is that an Ingress controller does not typically eliminate the need for an external load balancer, it simply adds an additional layer of routing and control behind the load balancer.
Figure 1. An architecture overview of using nginx Ingress controller
So why to choose Nginx Ingress controller? It probably can be the reason why as mentioned in the post 4 as mentioned on the AWS Blog:
By default, the NGINX Ingress controller will listen to all the ingress events from all the namespaces and add corresponding directives and rules into the NGINX configuration file. This makes it possible to use a centralized routing file which includes all the ingress rules, hosts, and paths.
With the NGINX Ingress controller you can also have multiple ingress objects for multiple environments or namespaces with the same network load balancer.
AWS Load Balancer Controller
AWS Load Balancer Controller is similar to the in-tree Kubernetes controller and use native AWS APIs to provision and manage Elastic Load Balancers. The controller was an open-source project originally named ALB Ingress Controller because it was only provides capability to manage Application Load Balancer at the intial stage, lately, it officially renamed as AWS Load Balancer Controller5, which is maintaining by AWS product team and open-source community.
Unlike in-tree Kubernetes controller needs to wait the upstream code to be updated, which requires you to upgrade Kubernetes control plane version if the controller has any bug or any new ELB features need to be supported. Using AWS Load Balancer Controller, it can gracefully be replaced because it will be running as Kubernetes deployment instead of relying on Kubernetes upstream source code integration.
The controller directly maintain your Elastic Load Balancer resources with up-to-date annotations. For nginx ingress controller, it can provision and add an extra load balancing layer with the Network Load Balancer, in this case, the traffic generally will pass through the controller itself (nginx-ingress); instead, for AWS Load Balancer Controller, it doesn’t play as a gateway. The AWS Load Balancer Controller will directly control the Elastic Load Balancer resource, which can register your Pod (by using IP mode) so the request can directly forward to your backend application.
The AWS Load Balancer Controller also starts to support TargetGroupBinding 6 and IngressGroup 7 feature since v2.2. It enables you can group multiple Ingress resources together, which allows multiple service deployments can share the same Elastic Load Balancer resource.
Conclusion: What controller should I use?
After comparing different load balancer controllers, generally speaking, using AWS Load Balancer basically can have better feature supports as well as adopt with the performance optimization by configuring AWS Load Balancer attributes correctly. It is essential to enable IP mode when applying the Kubernetes service deployment with AWS Load Balancer Controller to reduce unnecessary hop that can be caused by Kubernetes networking itself, which is generally not totally suitable for AWS networking and elastic load balancing feature.
However, the disadvantage of using AWS Load Balancer can be all features require to be supported by Elastic Load Balancer itself because the controller doesn’t involve additional functions to extend the traffic control. Using other controller still can have its benefit and provide different features that Elastic Load Balancer doesn’t have, such as using nginx Ingress controller you may be able to define forward service to external FastCGI targets, using Regular Expression to perform path matching … etc.
By the end of this article, I hope the comparison and information can better help you understand how to select load balancer controller that will be running in Amazon EKS, and choose the right option for your environment.
Thanks for reading! If you have any feedback or opinions, please feel free to leave the comment below.
]]>Yang-Xin Cao (Eason Cao)[AWS][EKS] Best practice for load balancing - 2. imbalanced problem2022-04-08T00:00:00-05:002022-04-08T00:00:00-05:00https://easoncao.com/eks-best-practice-load-balancing-2-enThis article is sharing the best practice for doing load balancing on Amazon EKS, learn what is advantage and disadvantage of using different controller. We will discuss more detail about the imbalanced problem after applying controller to deploy the Elastic Load Balancer.
The load imbalanced problem
Follow the example as mentioned in the previous article, if you deployed a Kubernetes service and noticed the utilization on your backend application is not balanced; or, if you are using AWS Load Balancer controller, Traefik, nginx-ingress controller by finding the Elastic Load Balancer wasn’t correctly separate the loads (when using instance mode to register your Pods as targets), and you may find the imbalanced traffic, that’s the major topic in this article would like to talk about: discuss how to improve and optimize it.
Problem description
Let’s say if I am deploying 4 Pods in my Kubernetes cluster, which is using the default deployment as mentioned below to expose my Kubernetes service:
$ kubectl get pod -o wide
NAME                                READY   STATUS    RESTARTS   AGE   IP
nginx-deployment-594764c789-5s668   1/1     Running   0          30m   192.168.42.171
nginx-deployment-594764c789-9k949   1/1     Running   0          30m   192.168.39.194
nginx-deployment-594764c789-b292m   1/1     Running   0          33m   192.168.29.24
nginx-deployment-594764c789-s226c   1/1     Running   0          30m   192.168.15.158
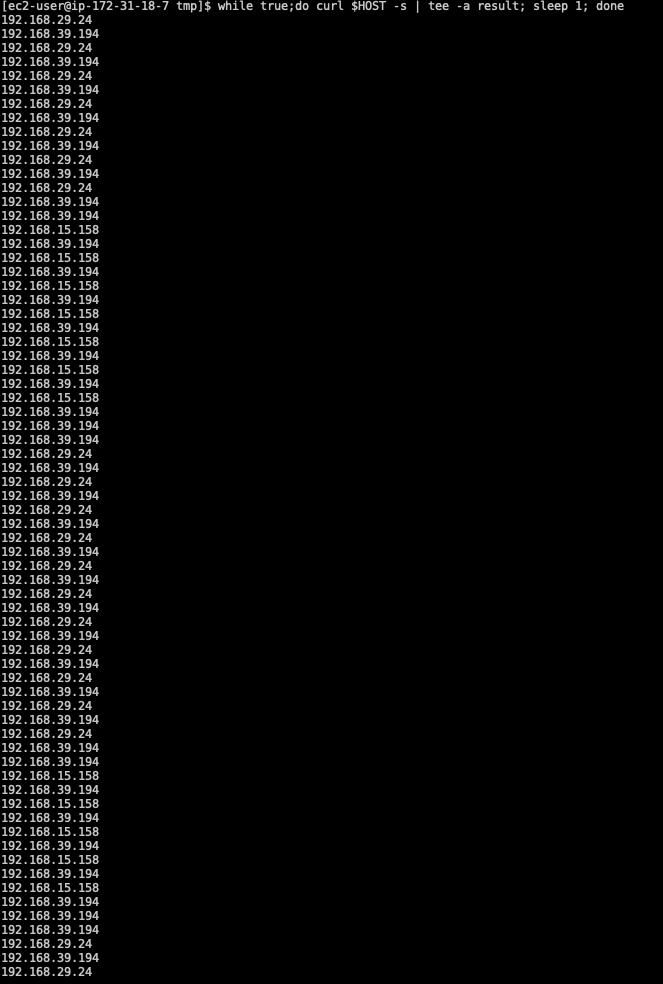
To better understand the problem I am describing in this post, the application I deployed will response Pod IP address to let us know which one received the request:
Figure 1. Testing the service and see the response from the backend.
After running a loop and making at least 79 HTTP requests in my test, I get the following response to know how the load has been distributed:
192.168.42.171: 12 times
192.168.39.194: 33 times
192.168.29.24: 23 times
192.168.15.158: 10 times
According to the testing, we can see the load is not very evenly distributed.
Why this could happen?
As mentioned in the previous post, whether you are defining externalTrafficPolicy=Cluster or externalTrafficPolicy=Local, the routing behavior is relying on iptables(or ipvs) can be unpredictable. Because it is doing second layer of load balancing, which is totally unnecessary for increasing a hop in AWS VPC.
Elastic Load Balancer in AWS already provides a straightforward solution to balance your loads, and its algorithm will try to distribute the requests to all backend servers as even as possible. Doing load balancing in Kubernetes network generally is increasing the complexity of your architecture, and make traffic can be hard to trace; or, even worse, cause the imbalanced issue as you can observe.
This also makes the load balancing became unpredictable. Although the traffic send to the registered EC2 instance can be evenly distributed; however, it doesn’t mean the load can be separated to Pods as well. You will never know which Pods will be routed due to this load balancing layer implemented by Kubernetes networking.
No matter choose Traefik, nginx-ingress, if you are still following the default load balancing pattern offered by upstream Kubernetes code, then you can expect the traffic can come with load imbalanced.
How to optimize the load balancing?
The major problem is the default load balancing behavior can involve the Kubernetes load balancing and add a hop for the traffic. So you may start to wondering how to better resolve this problem; however, there is no specific feature can be adjusted on Kubernetes to remove the default load balancing, but it still could be possible to skip the Kubernetes load balancing and forward the traffic to Pods directly.
If you are running Pods on Amazon EKS and using default AWS VPC CNI Plugin1, you can expect your Pods should have dedicated secondary private IP address that can be communicated within your AWS VPC network; therefore, it also means that the IP address can be registered to your Elastic Load Balancer as backend target. The flow can be:
Client -> NLB (forawrd request to IP target) -> Pod IPs (Reach out to Pods directly)
For Application Load Balancer (ALB) and Network Load Balancer (NLB), both provide a feature that you can register backend targets with IP addresses (NLB, ALB. Note: Classic Load Balancer doesn’t offer this option). We can simply to associate these Pod IP addresses as backend targets instead of using instances. As long as the Pod IP addresses are reachable, it can move the request be forwarded to the backend Pods by skipping the Kubernetes load balancing behavior.
Using IP mode
So how to register Pod IP addresses in Elastic Load Balancer? A seamlessly way is to deploy your Kubernetes service and use AWS Load Balancer Controller2 to enable this feature. Instead of using the default Kubernetes controller to deploy your Elastic Load Balancer, using AWS Load Balancer Controller helps you manage load balancer resource including all functionality features and different type of load balancer such as NLB, ALB, both are can be supported by the controller. After installing the AWS Load Balancer on your EKS cluster, you can enable the IP registration type for your Pods by simply adding annotations to the deployment manifests.
Network Load Balancer (NLB)
Here is a deployment sample that use IP targets with pods deployed to Amazon EC2 nodes. Your Kubernetes service must be created as type LoadBalancer:
To deploy application load balancer on Amazon EKS through the AWS Load Balancer Controller, you generally will create an Ingress object in your deployment. With the AWS Load Balancer Controller, it also provides supported annotation that can register pods as targets for the ALB. Traffic reaching the ALB is directly routed to pods for your service. Here is an example:
In the AWS EKS documentation, it also mentioned detailed guide regarding how to deploy these two load balancers and share an example by using IP target to register your Pods. If you are interested to learn more, please check out to the following documents to get more detail:
By using IP mode, it totally removes the layer of load balancing manipulated by Kubernetes. This generally forward requests to the Pods without doing second forwarding:
Figure 2. Register Pods with IP mode
Are you sure it is balanced? Let’s have a test!
This time I used the same testing strategy as mentioned in the first problem description section and ran four Pods associated with Network Load Balancer using IP mode, which is showing below:
After passing at least 50 requests, I can see the request distributions are showing below:
192.168.17.15: 10 times
192.168.27.143: 12 times
192.168.22.126: 14 times
192.168.14.48: 13 times
For each target, it nearly have ~25% chances will be routed evenly by the Network Load Balancer. Because it skip the load balancing layer of the Kubernetes, it will follow the routing algorithm3 and separate load evenly as we expected.
I tried to use IP mode but the traffic still get imbalanced
In my testing, I was running a couple of Pods with nginx image and provided simple web server in my backend. The scenario in this article mentioning generally is describing all targets were using stateless HTTP connections. However, in some cases, it could be possible ELB might unequally route traffic to your targets if:
Clients are routing requests to an incorrect IP address of a load balancer node with a DNS record that has an expired TTL.
Sticky sessions (session affinity) are enabled for the load balancer. Sticky sessions use cookies to help the client maintain a connection to the same instance over a cookie’s lifetime, which can cause imbalances over time.
Available healthy instances aren’t evenly distributed across Availability Zones.
Instances of a specific capacity type aren’t equally distributed across Availability Zones.
There are long-lived TCP connections between clients and instances.
The connection uses a WebSocket.
Generally speaking, if the client or any configuration can cause sticky session, it still have possibility can get the traffic imbalanced. The detail can refer to the following article on AWS knowledge center:
But overall, using the IP mode to register our Pods, literally can resolve the problem as we described due to the design of Kubernetes service networking.
A summary if you would like to optimize the traffic imbalanced when using AWS Load Balancer Controller
Using IP mode as register target to prevent Kubernetes additional hop
Although Elastic Load Balancer can offer an option to register your targets by instances, however, it generally would be suitable when you are running single service and expose it with a port on a dedicated EC2 instance. With Kubernetes service running on your EC2 instance but exposed as NodePort service, it can involve multiple Pods behind the service port offered on your instance due to the service load balancing. The packet can be replaced to other destination field of your Pod’s private IP address when the packet flood into the instance through Linux ipvs or iptables rules.
If the service work load is relying on Kubernetes deployment, it is recommended such as service.beta.kubernetes.io/aws-load-balancer-nlb-target-type for NLB, alb.ingress.kubernetes.io/target-type for ALB.
Prevent to enable sticky session on ELB
It is also important to make sure the Elastic Load Balancer won’t stick your client session to specific target45. Although Elastic Load Balancer provides cookie-based stickiness session to bind a user’s session to a specific target, which can be achieved by configuring the load balancer attribute and also supported by AWS Load Balancer Controller as below, but to optimize the traffic imbalanced, it is recommended to avoid use the sticky session as it can potentially cause the phenomena.
As ELB requires to strike the balance between your Availability Zones to ensure the service high availability. This helps your traffic can correctly be separated on all backend target.
Summary
In this article, it explains the practice of optimizing the load balancing and mitigate the imbalanced traffic problem when deploying service with Kubernetes. This article also brings you an overview and learn what other scenarios that you can potentially find out ELB might unequally route traffic to your backend targets.
In the next article we will review a couple of Kubernetes load balancer controllers that can be deployed on Amazon EKS and see what option can be the best practice for your environment.
]]>Yang-Xin Cao (Eason Cao)[AWS][EKS] Best practice for load balancing - 1. Let’s start with an example from Kubernetes document2022-04-08T00:00:00-05:002022-04-08T00:00:00-05:00https://easoncao.com/eks-best-practice-load-balancing-1-enThis article is sharing the best practice for doing load balancing on Amazon EKS, learn what is advantage and disadvantage of using different controller. We will discuss more detail about what is the problem of using default Kubernetes service deployment as mentioned on official document.
Understand the default Kubernetes load balancing
An overview of externalTrafficPolicy
I have many occurrences to see Kubernetes administrators are not very familiar with the Kubernetes network flow, and feel struggling about that when they need to diagnose networking issue, especially for users using managed Kubernetes cluster service. But I think that’s normal to see this gap because it reflects Kubernetes is doing encapsulation perfectly, causes you are unable to easily troubleshoot any real-world failures unless you had deeply understand its design.
Before walking through the detail about the load balancing, it is required to understand the fundamental knowledge of Kubernetes load balancing and its effect when defining your YAML files.
In the Kubernetes, it provides External traffic policy, so you can set this field (spec.externalTrafficPolicy) in your Kubernetes service deployment to control the flow, and decide how to route the traffic from external. Kubernetes offers two options for this policy: Cluster and Local, let’s have a deep overview to see how it works:
Figure 1: externalTrafficPolicy
By default, the kube-proxy is performing this layer of load balancing by using iptables. Based on the Pods you are running, it will create rules in your iptables and uses random mode (--mode random) to perform the load balancing based on the probability. For example, if you have 3 Pods need to be distributed, kube-proxy will take the responsibility to add required iptables rules with defined probability, and try to balance the load:
I am not going to drill down into too much detail as it can increase the complexity of this article, however, if you are interested to learn how this translation happens, you can review the iptables rules on your host to see what’s going on.
# An example of iptables rules
-A KUBE-SVC-XXXXX -m comment --comment "default/app" -m statistic --mode random --probability 0.20000000019 -j KUBE-SEP-AAAAAA
-A KUBE-SVC-XXXXX -m comment --comment "default/app" -m statistic --mode random --probability 0.25000000000 -j KUBE-SEP-BBBBBB
-A KUBE-SVC-XXXXX -m comment --comment "default/app" -m statistic --mode random --probability 0.33332999982 -j KUBE-SEP-CCCCCC
-A KUBE-SVC-XXXXX -m comment --comment "default/app" -m statistic --mode random --probability 0.50000000000 -j KUBE-SEP-DDDDDD
-A KUBE-SVC-XXXXX -m comment --comment "default/app" -j KUBE-SEP-EEEEEE
As mentioned in Figure 1, when externalTrafficPolicy=Cluster, it can have a scenario will route the traffic to other Nodes if you deploy Pod(s) on them. By relying on the iptables rules, this policy can accomplish the load balancing by redirecting them to other Nodes. In theory, this can bring the traffic jump out of the original Node.
When externalTrafficPolicy=Local, it limits the traffic only can be redirected on the same Node; however, the behavior of doing load balancing through the iptables still happens. If you have multiple Pods running on the single Node, the traffic can be routed to one of them.
Deep dive into the load balancing behavior - An example from K8s document
Let’s see an example mentioned at official Kubernetes document1:
If you use AWS as cloud provider and deploy the service, it generally will create an Elastic Load Balancer (Classic Load Balancer) and provide the traffic load balancing. The Elastic Load Balancer will be managed by the in-tree load balancer controller2, which is implemented in Kubernetes source code; hence, you can simply provision the Elastic Load Balancer on AWS seamlessly.
Looks familiar, right? The example above is quite common if you find tutorial on somewhere. Maybe that is exactly same configuration running in your production environment.
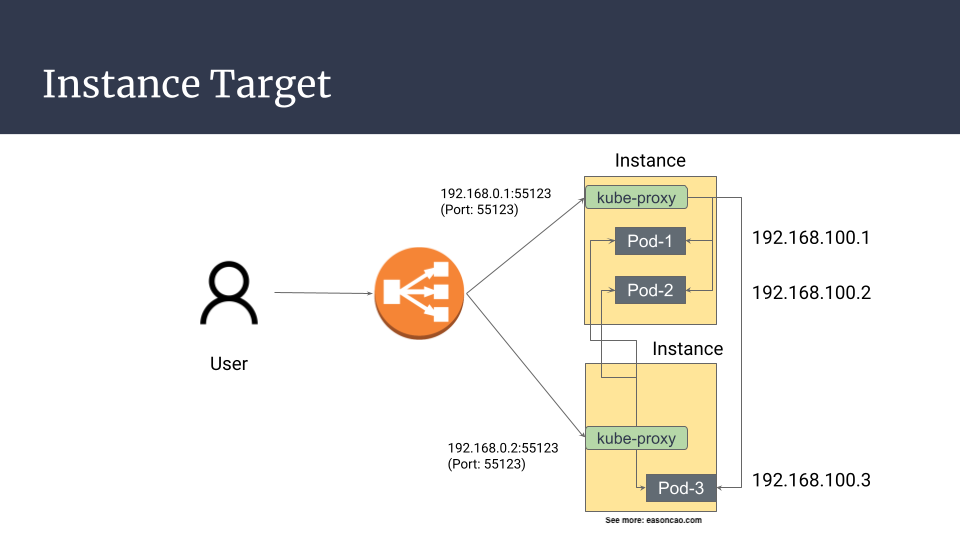
But here is the problem: by default, Kubernetes implements another layer of load balancing, which is backed with kube-proxy. Let’s say if you have two worker nodes (Node-1 and Node-2), and each node have Pods running on it (Pod-1, Pod-2 on Node-1; Pod-3 on Node-2), using default option (externalTrafficPolicy=Cluster). On AWS, the traffic flow generally is representing as below:
Case 1
The default Kubernetes service will expose your application with a specific service port to provide external accessibility (NodePort), and establish relevant iptables rules to perform NAT traslation by replacing the IP address of the destination field.
With this design, this can be a happy case if kube-proxy doesn’t redirect the request to other host, which can be outlined as:
On the other hand, if you deploy a Kubernetes service like this, the traffic flow can be routed as two particular phenomena:
Figure 3: The traffic flow when working with externalTrafficPolicy
As you can see, no matter what it is, the behavior seems like doesn’t provide a better route because it definitely increases the number of hops for the traffic flow.
What about externalTrafficPolicy: Local? Does it work better?
Follow the example as mentioned in the previous paragraph, let’s say if you have two Pods (Pod-1 and Pod-2) running on the same Node (Node-1). The traffic flow of this policy generally can be breaking down as below:
When load balancer move the request to the backend (Node-1), the probability to forward the request by iptables rules to the Pod-1 and Pod-2, is 50% chances.
On the other hand, the traffic firstly pass through the Elastic Load Balancer, and do the routing again in the system level (iptables), which means the architecture will perform the load balancing twice.
With no doubt, it did not offer the best path for the traffic routing.
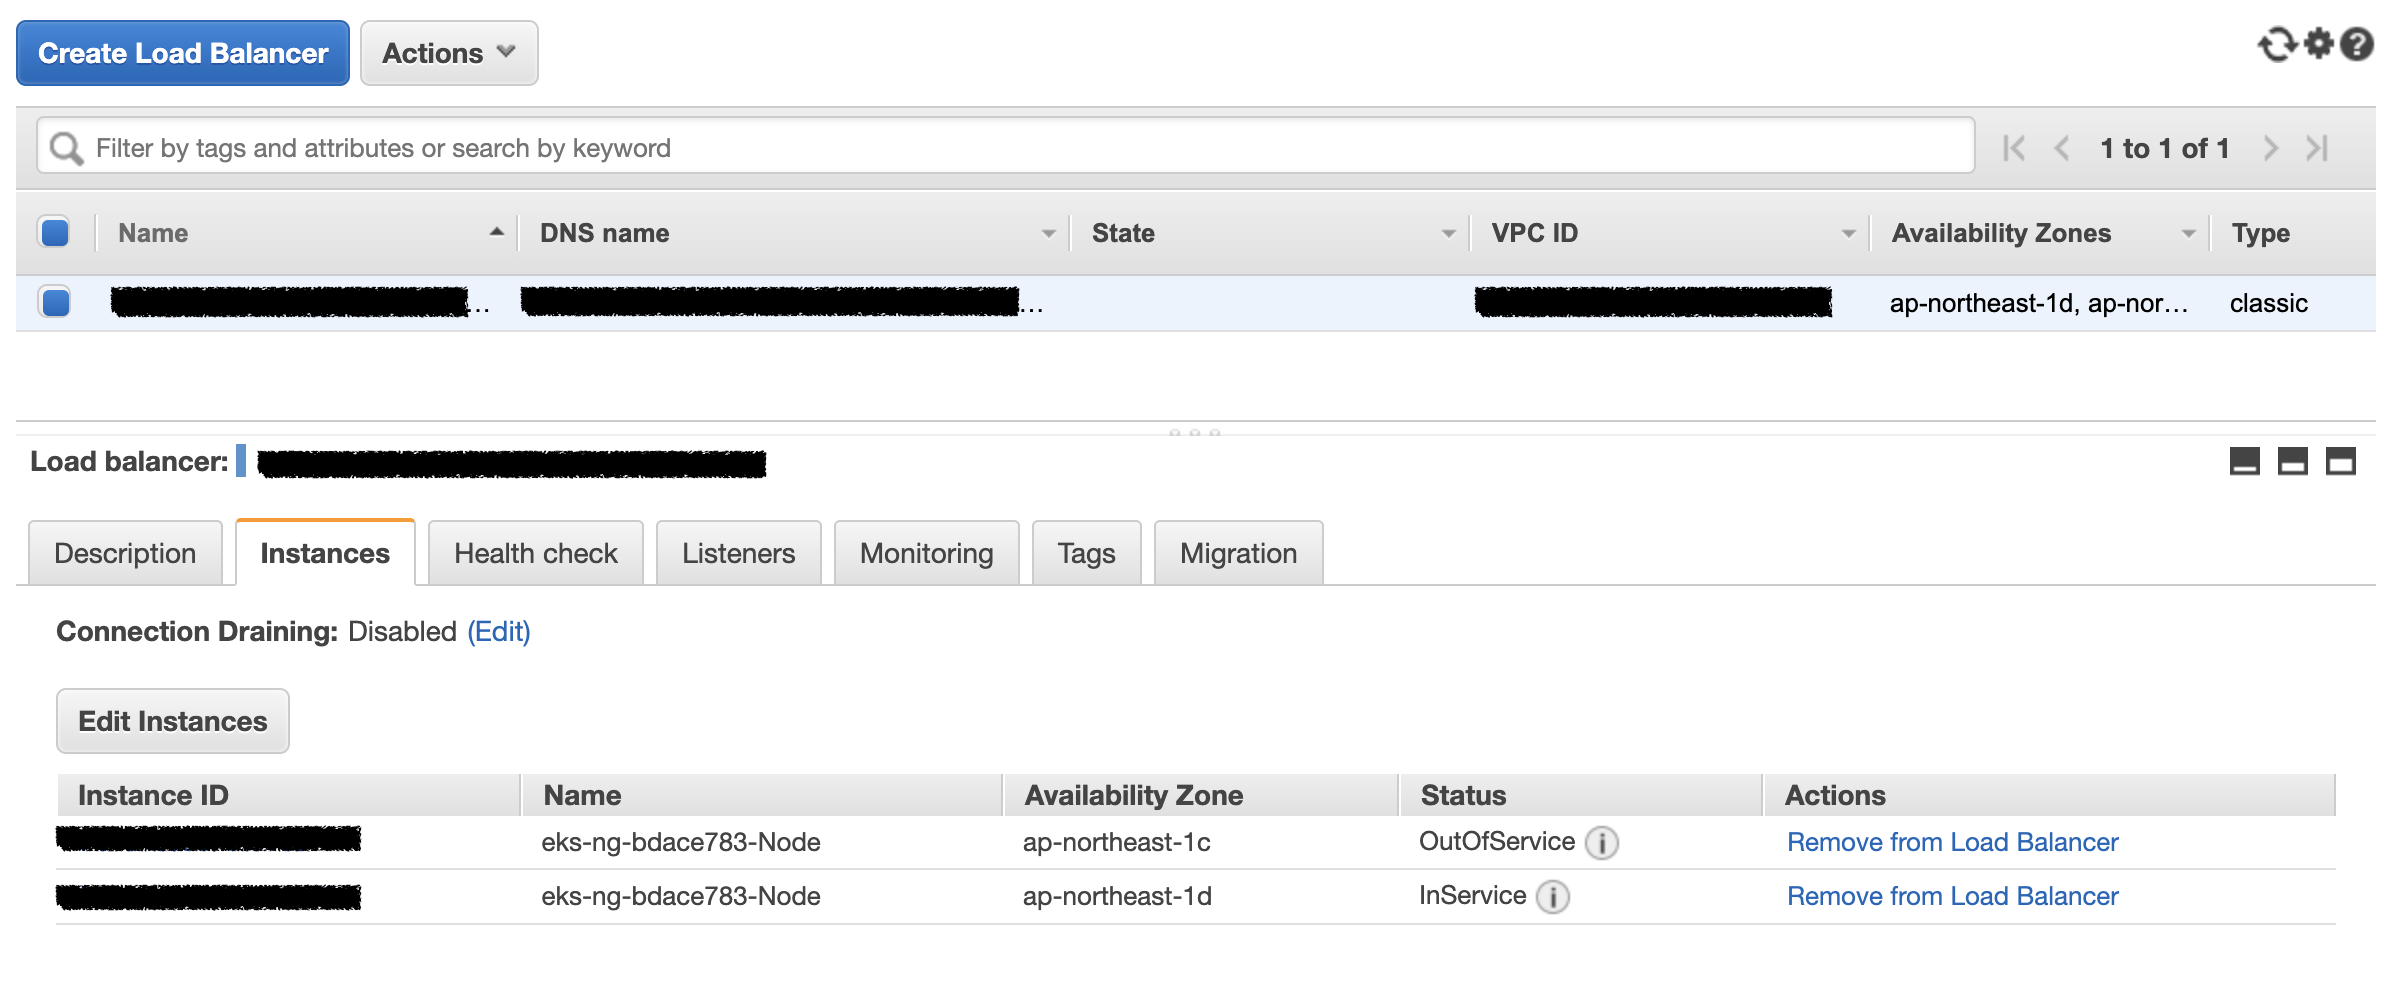
The reason why you will see your targets are failing the health check even Pods are running
If externalTrafficPolicy=Local and you have multiple Nodes running behind your Elastic Load Balancer, you probably will see some Nodes will fail the health check, which can be expected.
That’s because if some Node doesn’t run the service’s backend Pods so it cannot pass the health check.
Figure 4: Some Node doesn’t pass health check due to externalTrafficPolicy
In general, it doesn’t impact anything because the ELB will ensure only healthy targets can be routed; however, in this case, it doesn’t perfectly distribute the load with Elastic Load Balancer and offer high availabilty when we have multiple Pods. If the Node down, it can impact all Pods running on it.
What’s wrong with externalTrafficPolicy?
So, looks like using externalTrafficPolicy=Cluster is a good option?
Imagine you have a long running connection is jumping out of the first Node, unfortunately, the first Node is having issue such as hardware failure, intermittent connectivity problem … etc. In the end, it is going to be down. In this case, if any existing connections forwarded from other Nodes, the connections will be impacted and cannot response back to the origin correctly. In general, the Node down can cause the packet loss because the connection route is established in the middle:
(If you have established connection passed the Node, here is an example of the breaking route situation if the Node-1 in the middle is down.)
If you reviewed the flow of Figure 3, connections can be routed to different paths and it can be hard to predict once you deployed many Pods. It also increase the complexity if you would like to trace the networking flow during the problem diagnostic.
When having a large scale scenario (e.g. deploy 100, 500 even 10,000 Pods), this also can potentially bring the system level issue, or, result in the packet loss, such as network latency increased due to kernel needs to compare several iptables rules when a new connection comes in; or, reach out to the kernel limits for the networking stack, because Linux kernel needs to track of them when working with iptables, and insert the rules on the system level. One common issue is to fill out the connection tracking table (conntrack) of the Linux kernel when the scale grows.
Summary
In this article, it explains the behavior of load balancing on Kubernetes. This article also brings you an overview and learn what issue can occur if you follow the default Kubernetes example to deploy your Elastic Load Balancer.
Now we have deep-level understanding of the Kubernetes load balancing, let’s start with more discussion regarding the load imbalancing problem with the current architecture on Amazon EKS in the next article.
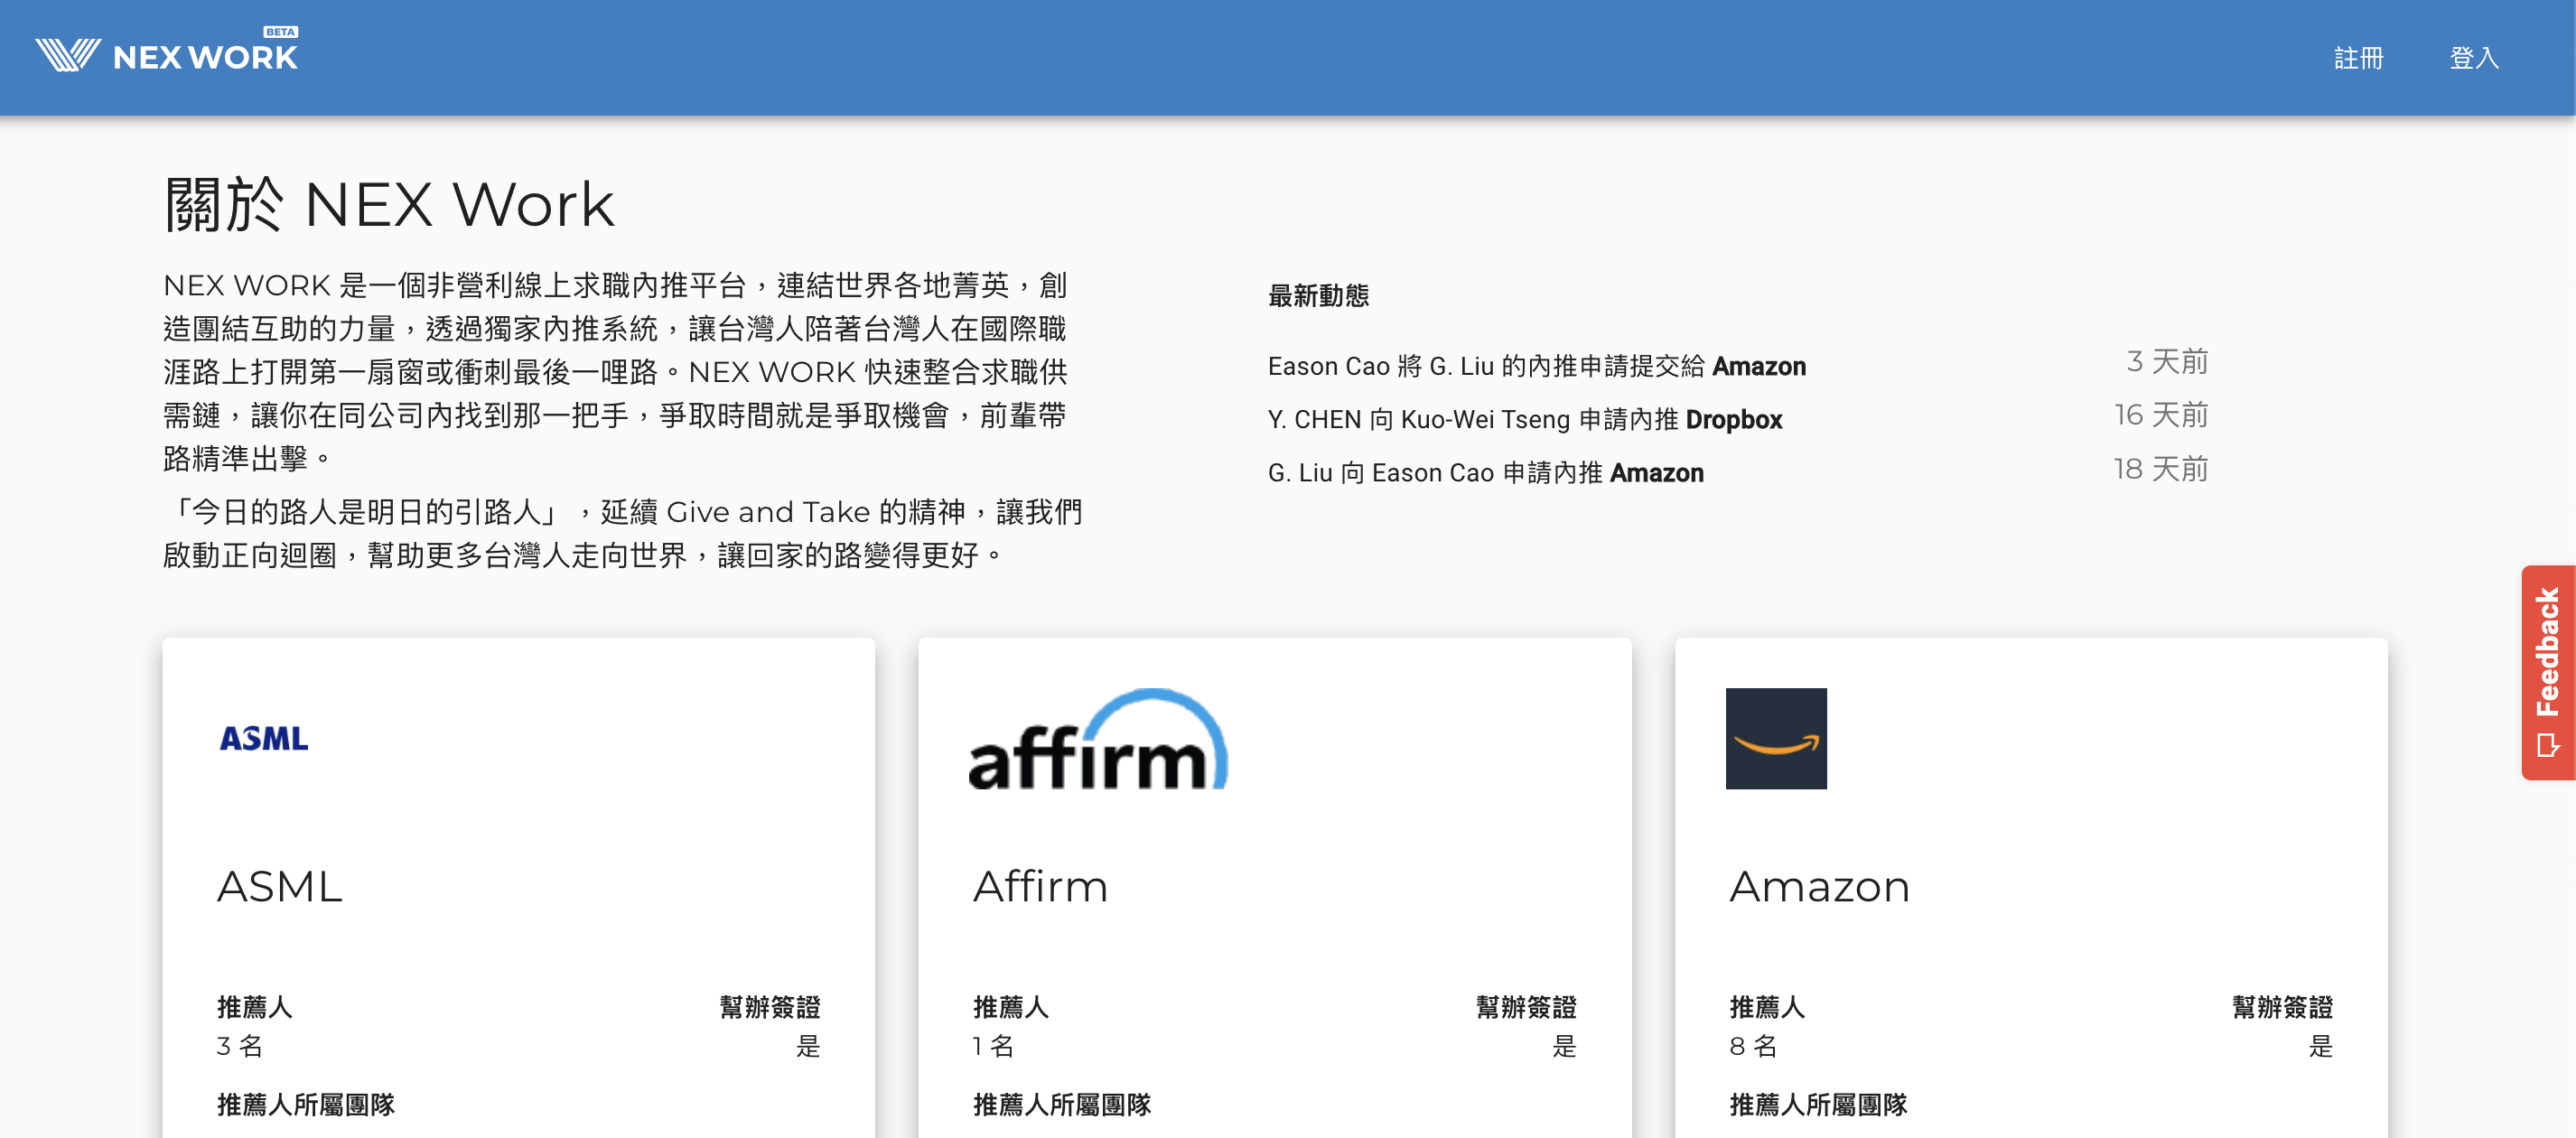
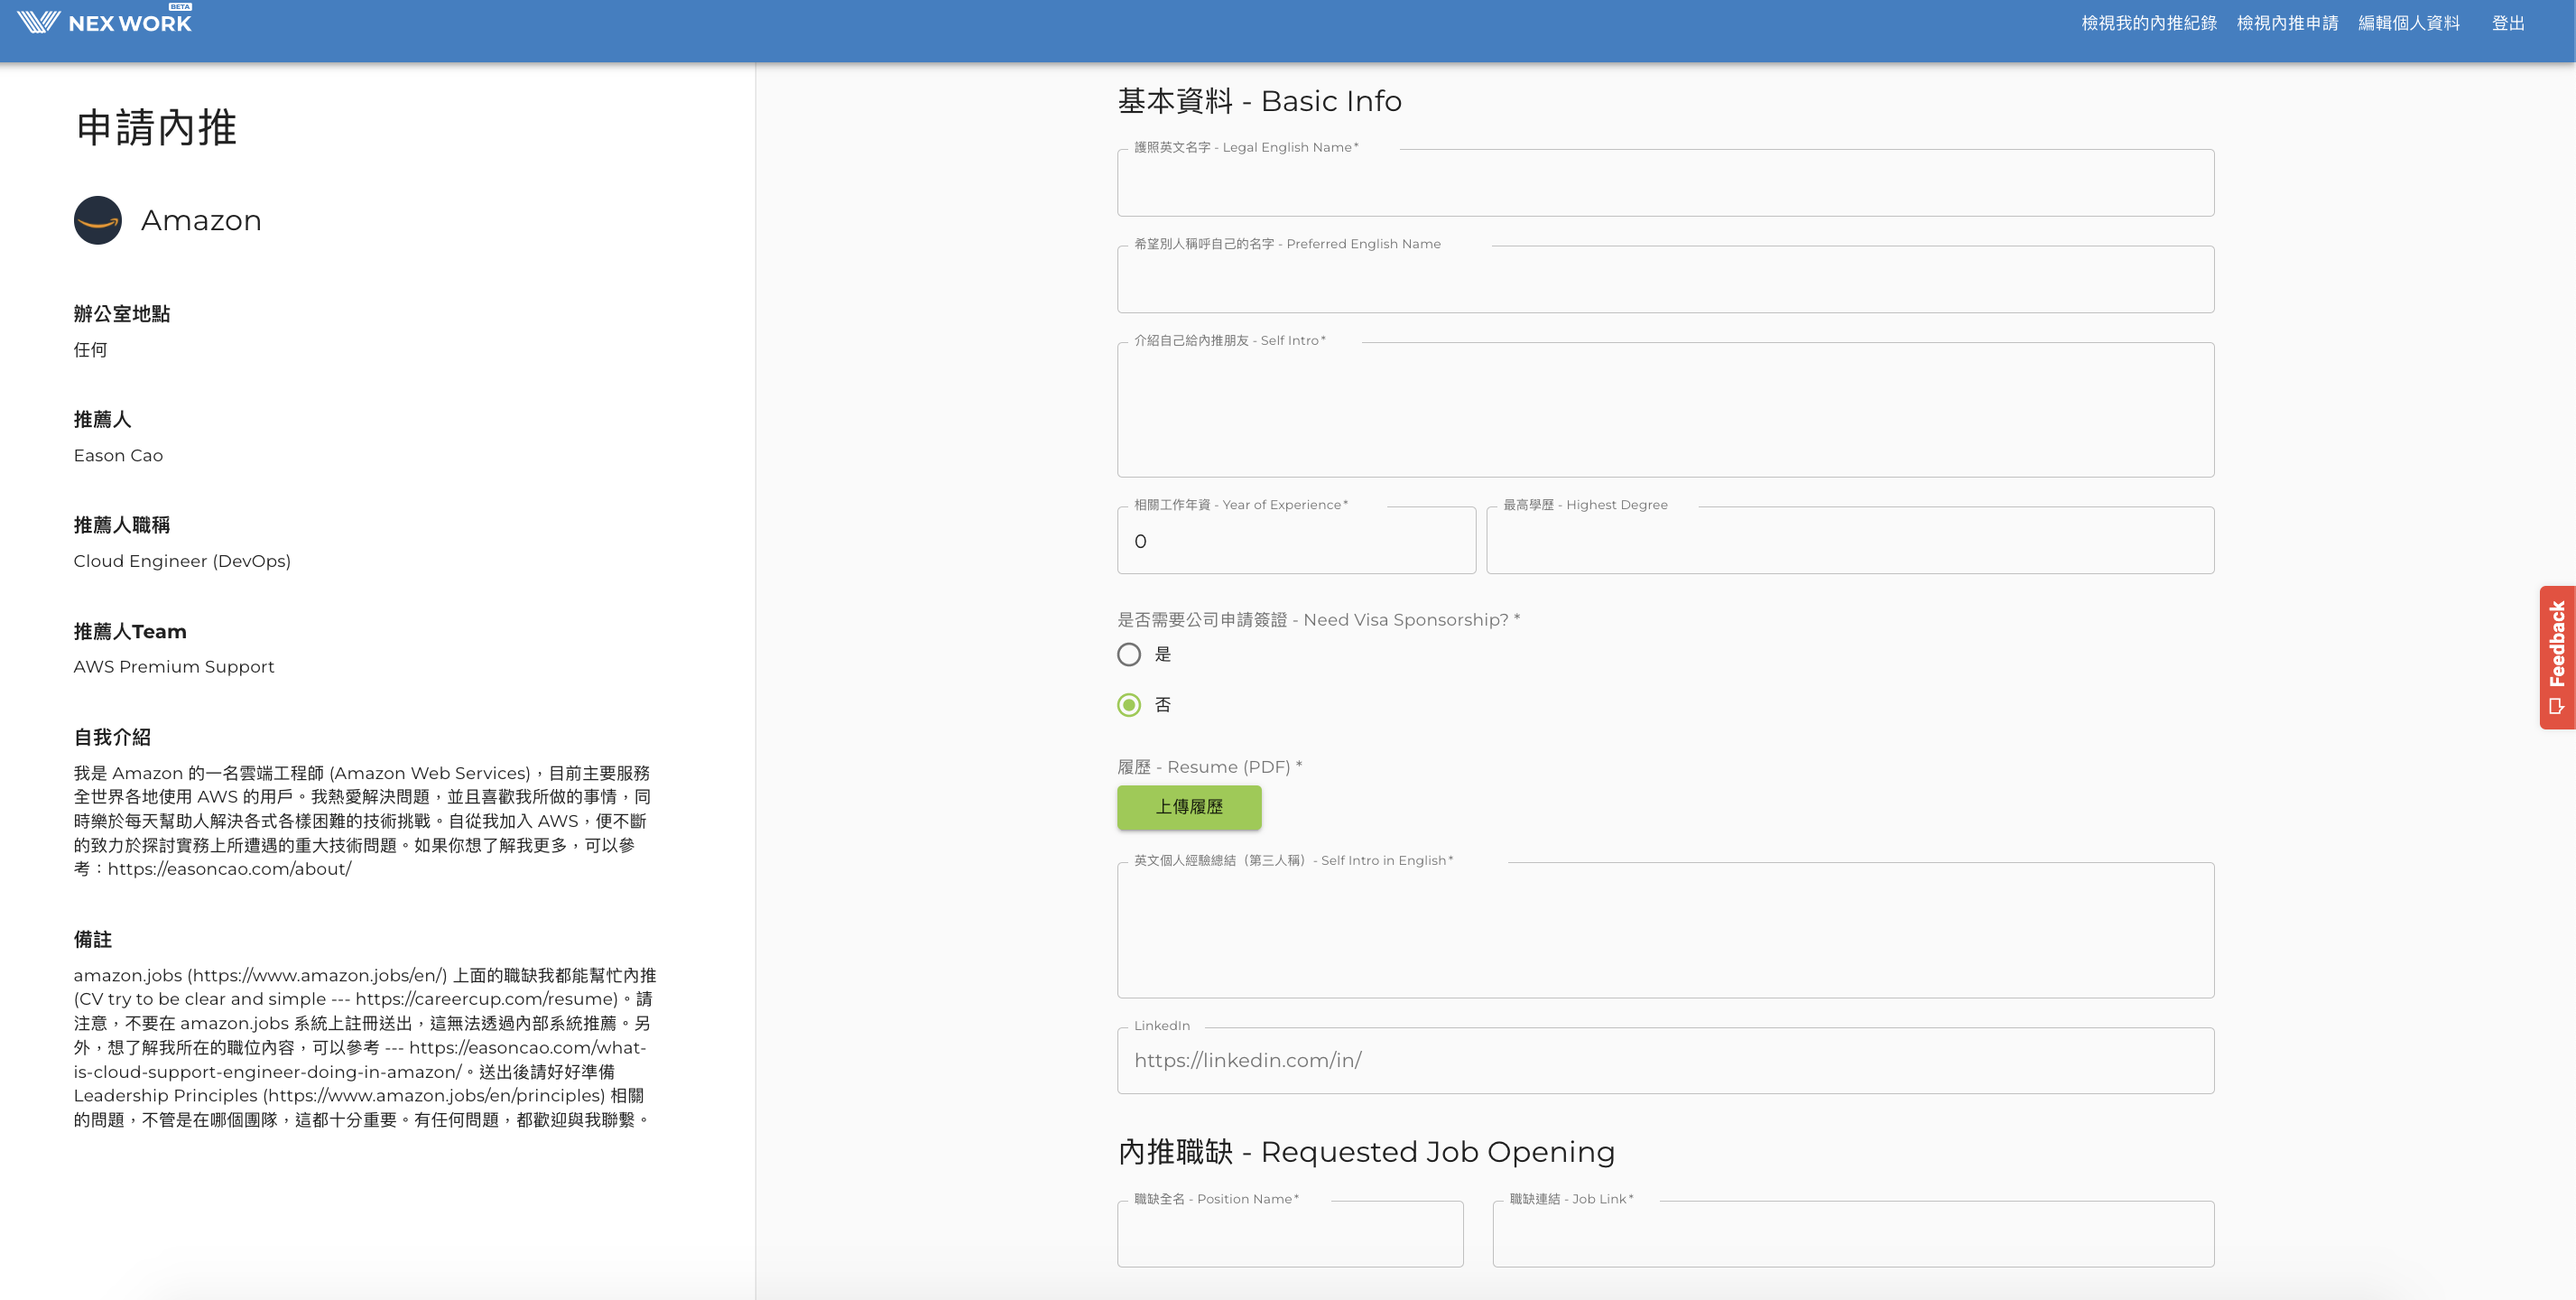
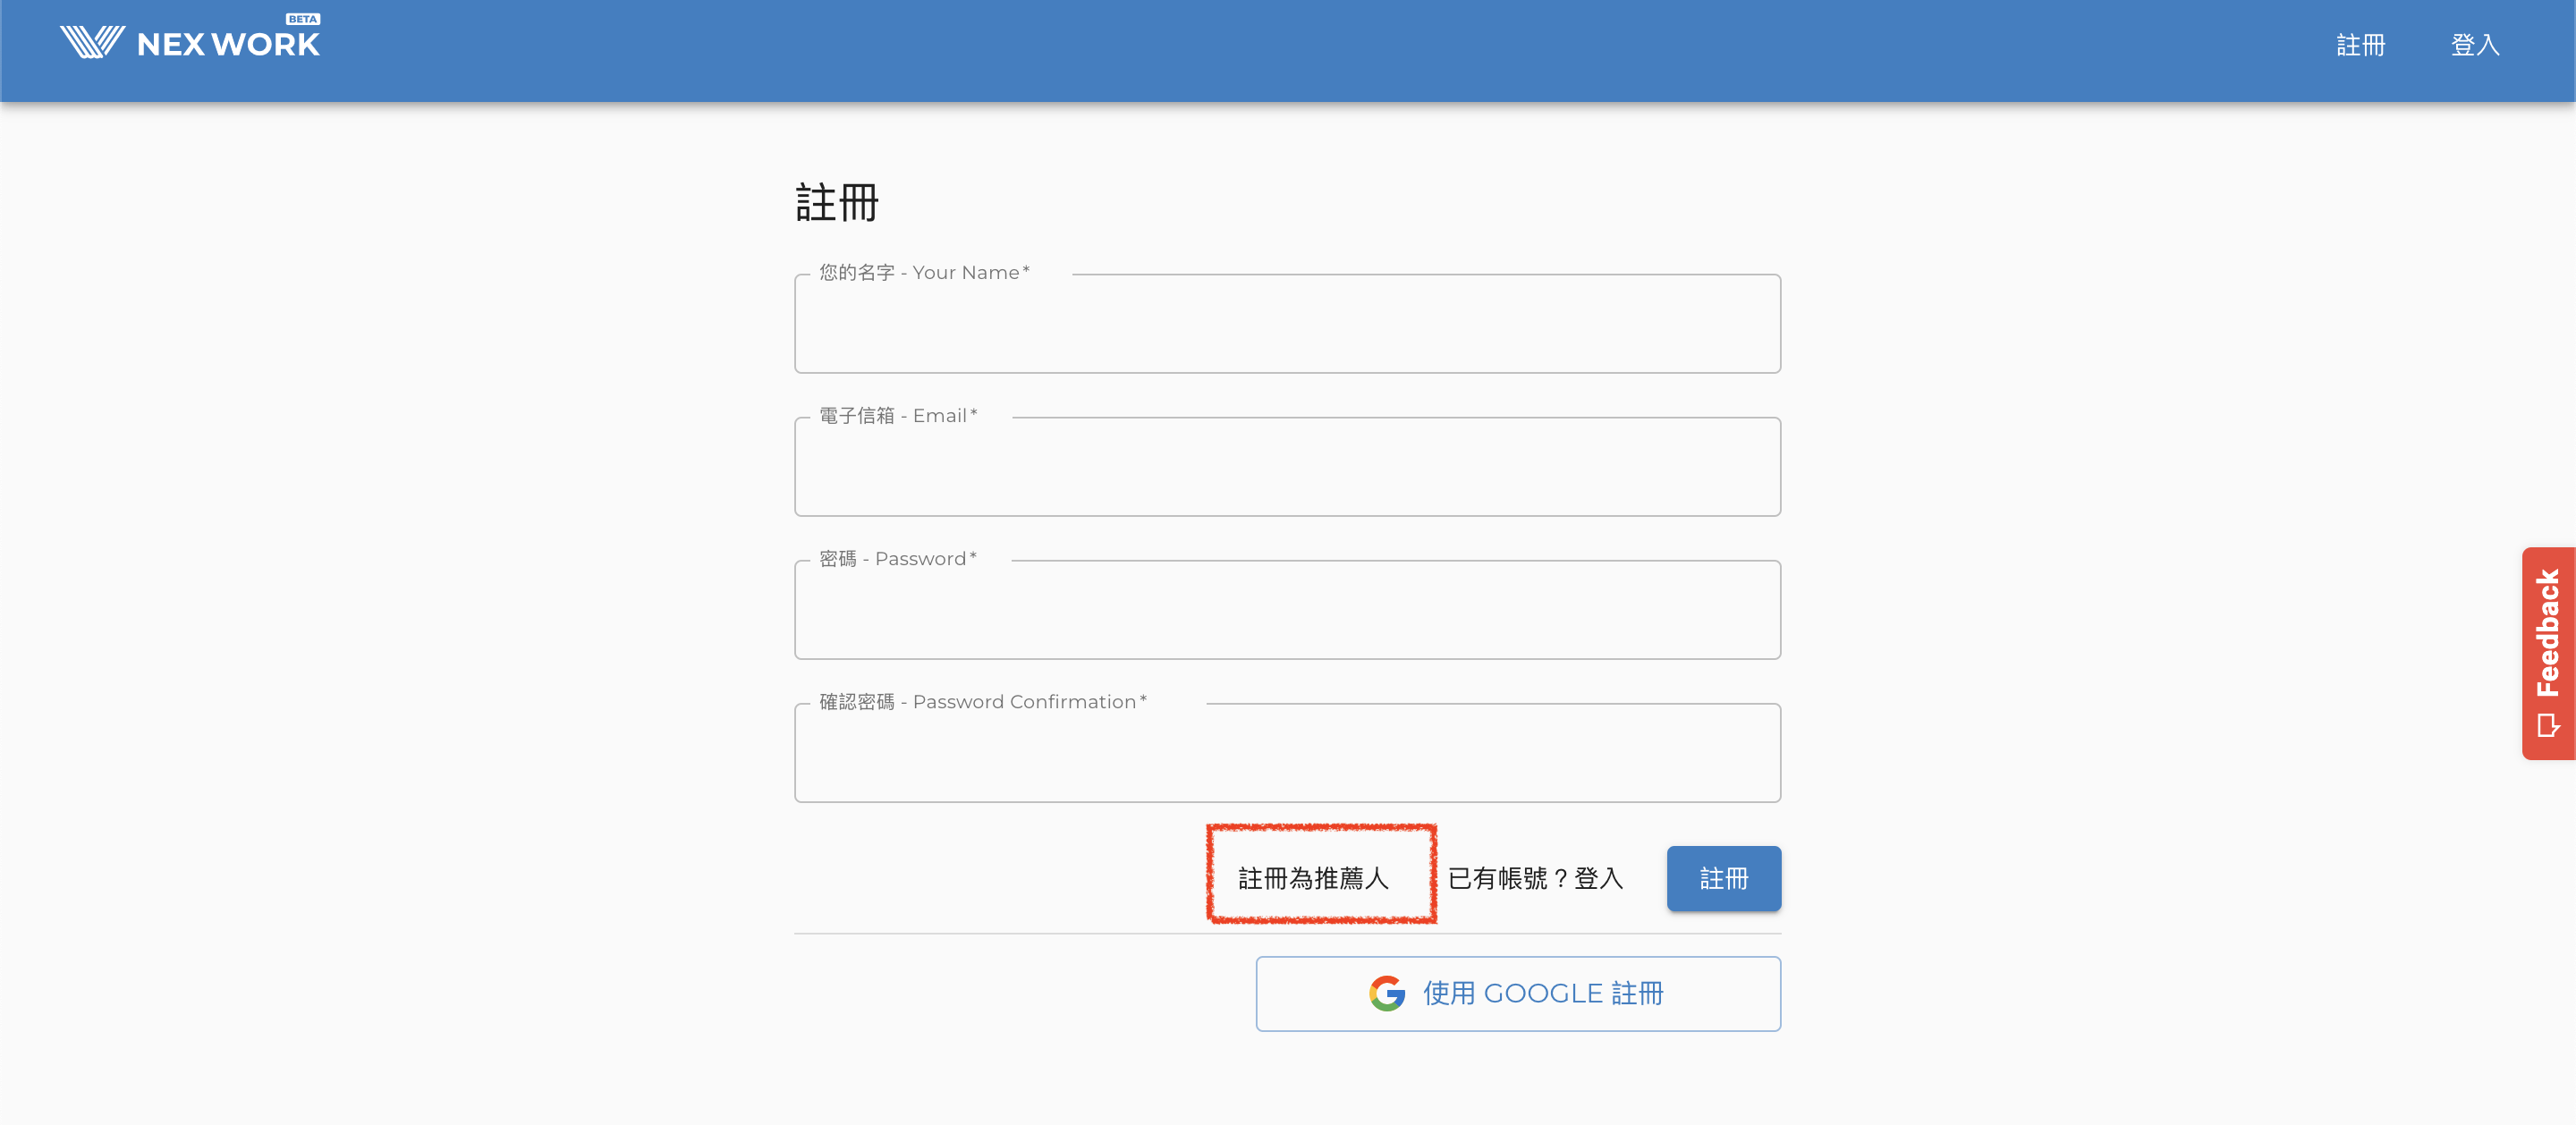
]]>Yang-Xin Cao (Eason Cao)NEX WORK - 獲得國際大公司的內推機會、串連世界各地菁英:如果流浪是為了找回家的路,我們有責任把回家的路變得更美好2022-03-12T00:00:00-06:002022-03-12T00:00:00-06:00https://easoncao.com/nex-work我們知道獲得國際大公司的內推機會對於台灣人十分困難,為了串連海外台灣人才菁英並且開啟另類海外求職內推的機會,我將在這篇內容中與你分享你可能會感興趣的資源:NEX WORK — 一個非營利線上求職內推平台。
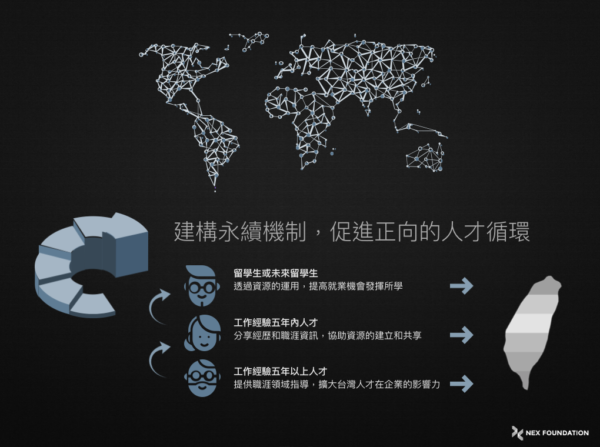
(source)
NEX WORK 由一群 NEX Foundation (台灣未來基金會) 台灣熱血的工程師建置,目的在於打破對於海外求職的高門檻和增加被看見的機會,以串連在世界各地的海外菁英,建立永續的機制,並促進正向的人才循環。
NEX Foundation 台灣未來基金會是什麼?
NEX Foundation 台灣未來基金會成立於 2018 年,為美國聯邦政府核准的 501(c)(3) 非營利慈善新創機構。NEX 以美國西雅圖及台灣台北為據點,希望透過研發和經營線上的資源平台,協助海外人才在國際舞台上的職涯發展。並更進一步扮演橋樑的角色,連結活躍於世界各地的台灣人才,共同推動企業媒合、職涯諮詢、媒體實驗、社群聚會等計畫,期盼建立具有延續性的全球台灣人才互助圈。
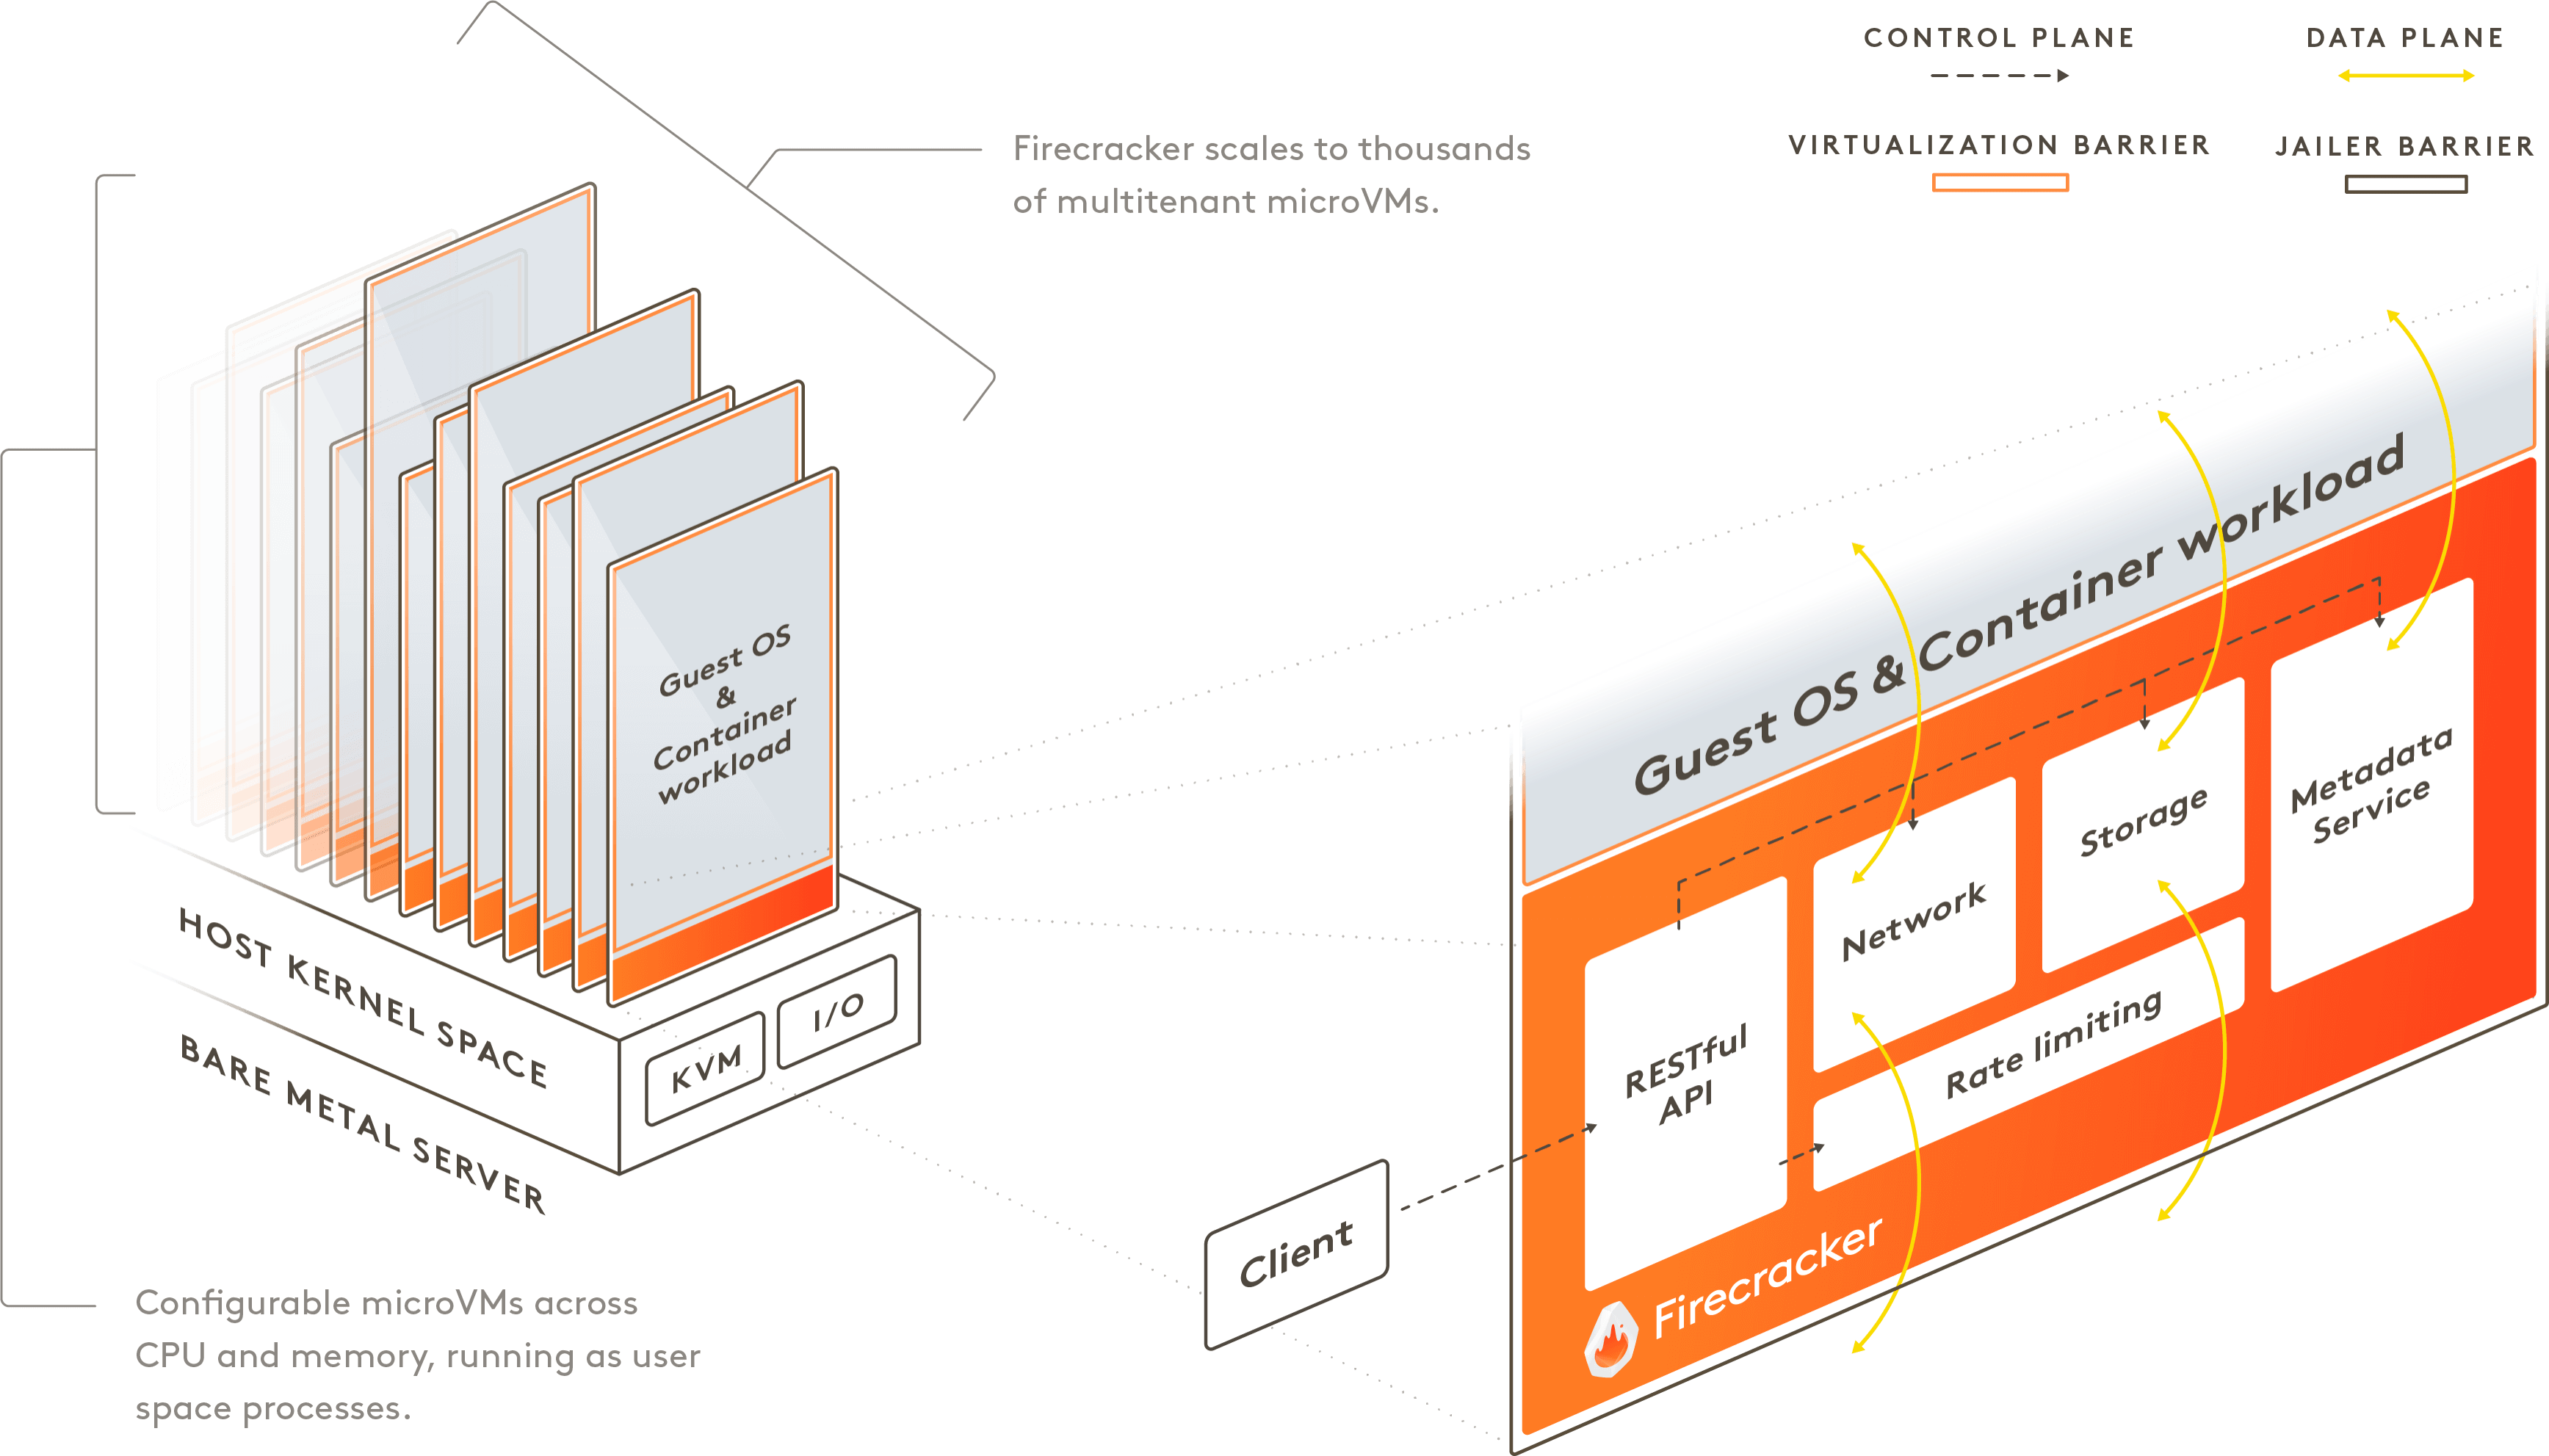
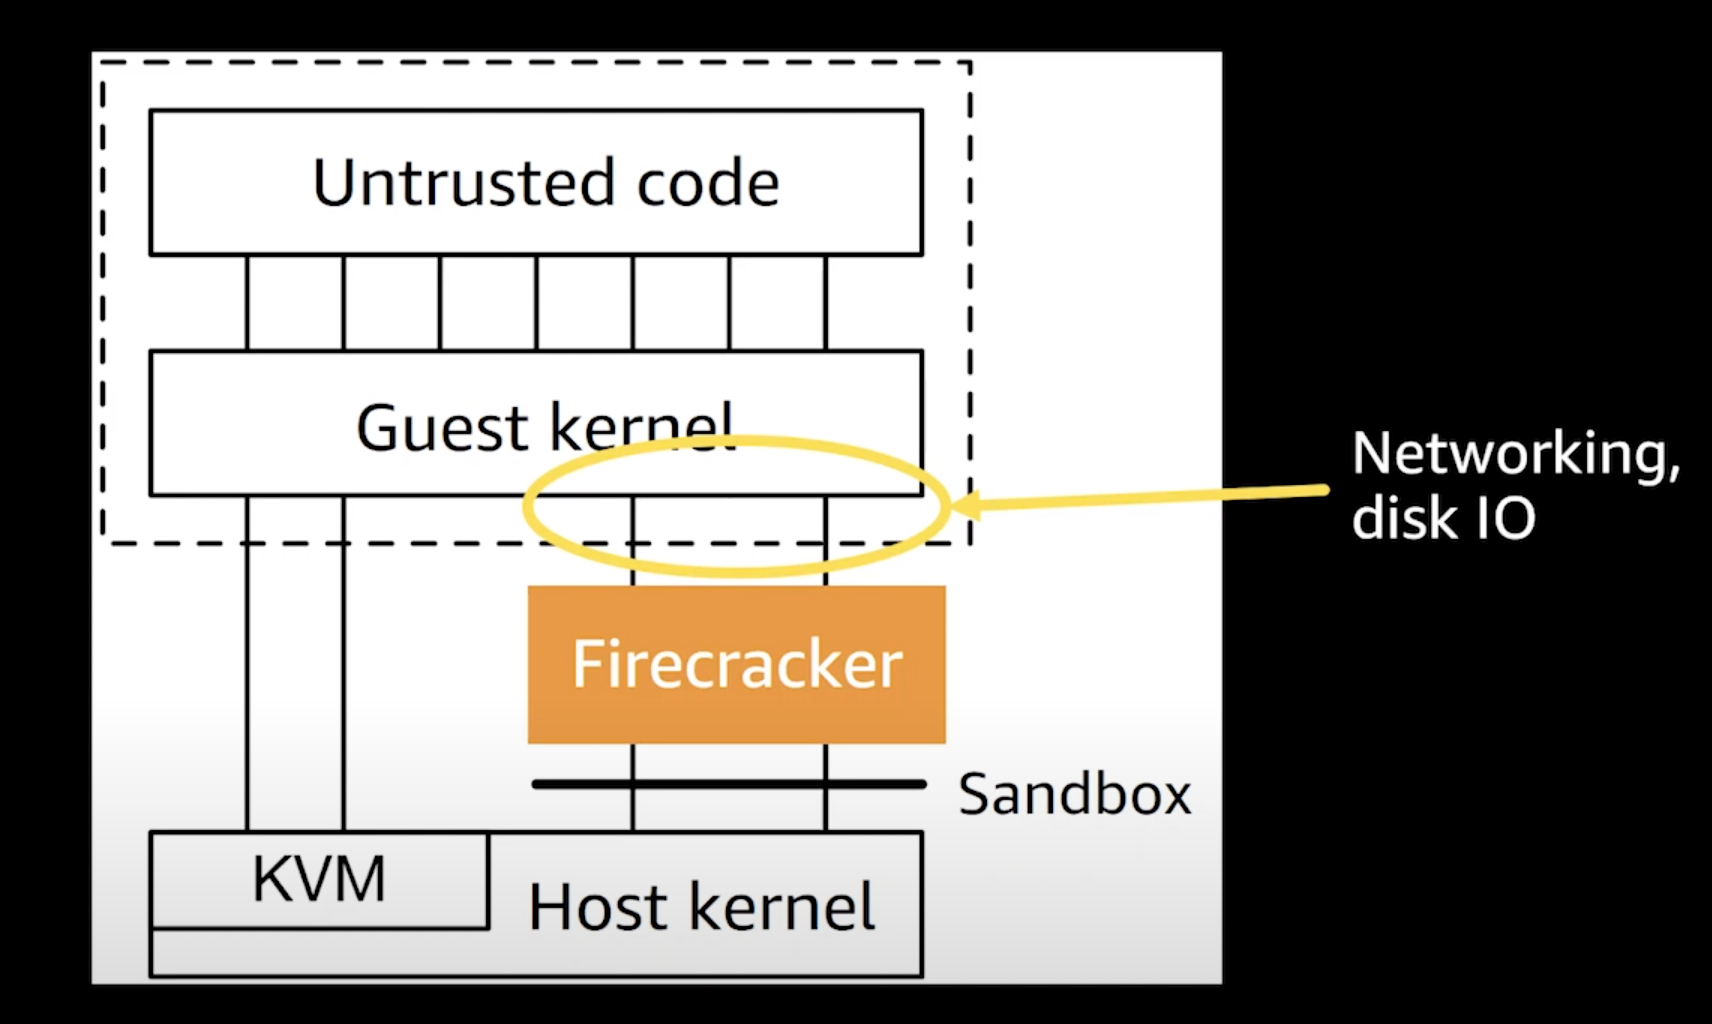
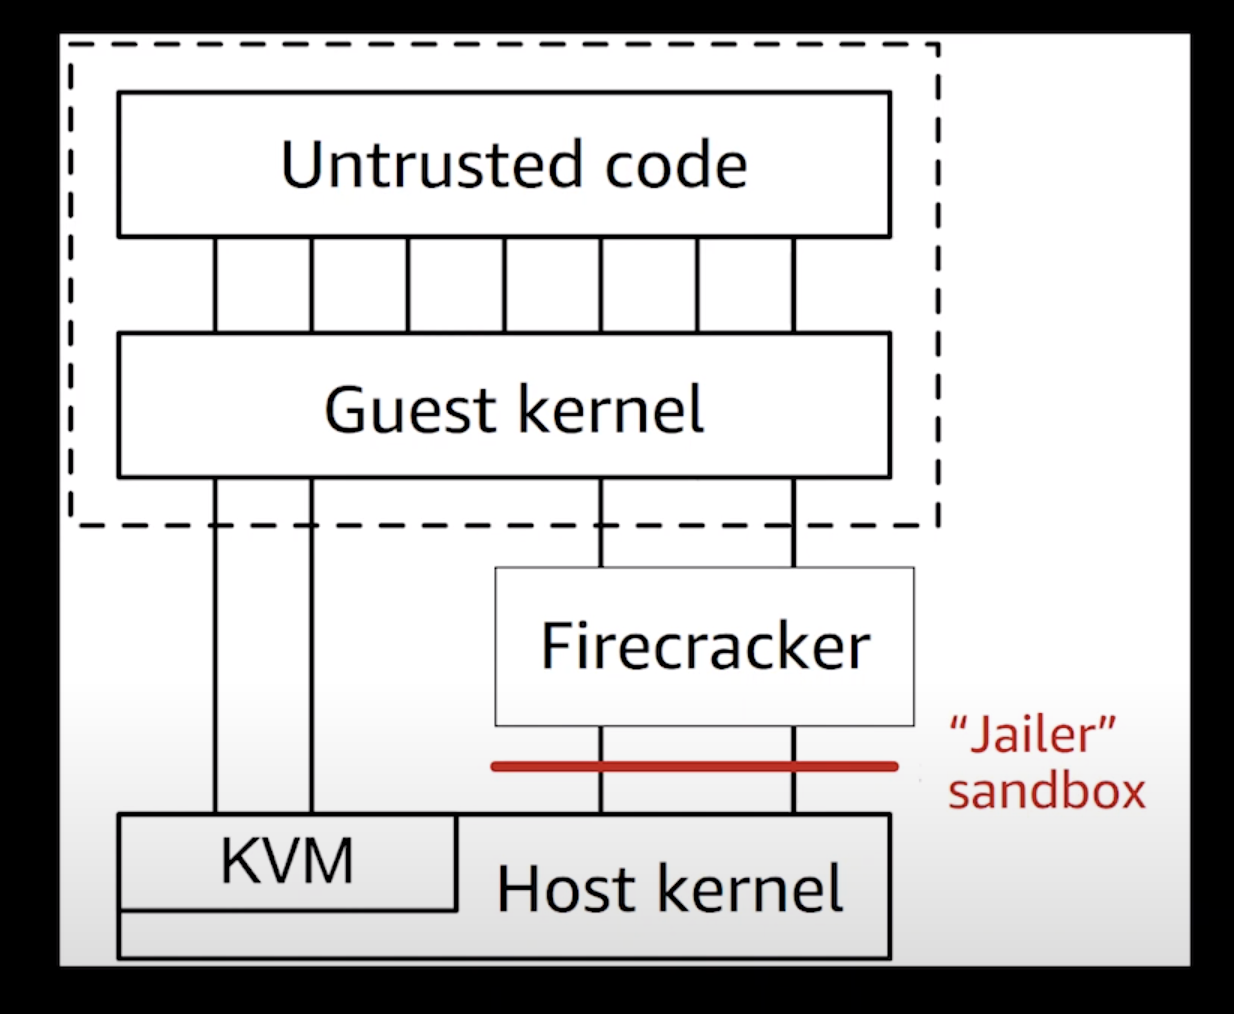
Implementors of serverless and container services can choose between hypervisor-based virtualization (and the potentially unacceptable overhead related to it), and Linux containers (and the related compatibility vs. security tradeoffs). We built Firecracker because we didn’t want to choose.
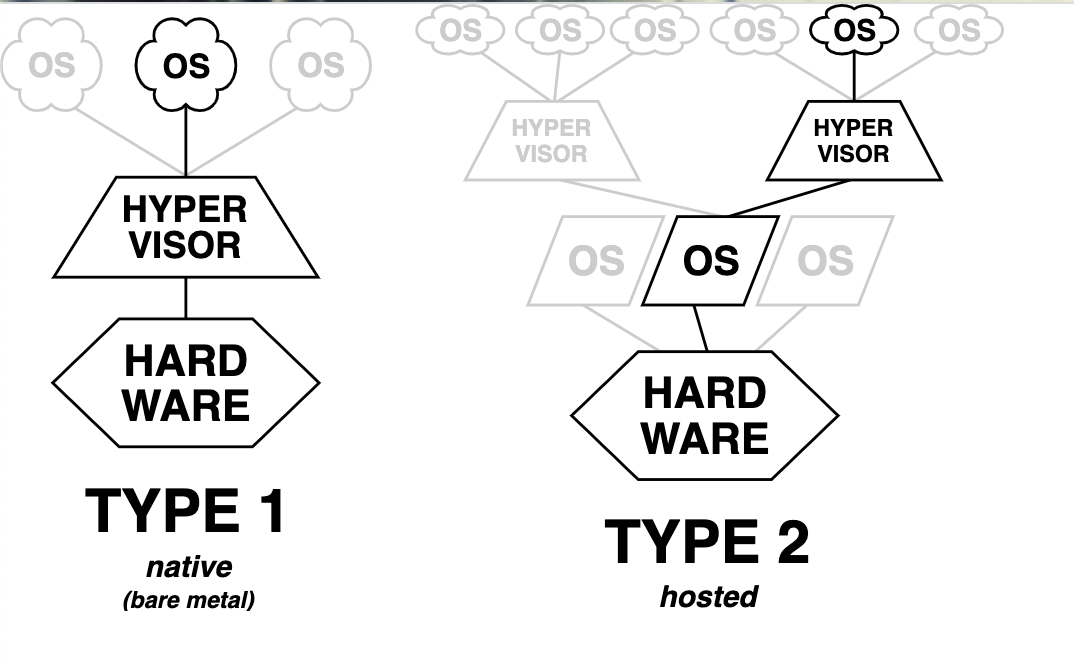
因為在虛擬機器中,安裝了一個 Guest OS 並不意味著就能直接使用 Host OS 的所有資源 (例如:磁碟寫入、CPU 時間、I/O 等操作)。通常,Hypervisor 會實作「模擬」這些裝置讓 Guest OS 以為能夠使用,但實際上仍交由虛擬化技術實際將這些操作轉譯、排程交給 Host OS 處理。
Type 1 的 Hypervisor 通常需要硬體和 Kernel 支援,因為通常能充分交付使用硬體操作,而無需透過 Hypervisor 為 Guest OS 執行作業系統各種操作的 (syscall) 轉譯。這也通常意味著,執行的效能也比較高。常見的實作如:Xen 和 Linux KVM。
Type 2 軟體會運行於主要的 (Host OS) 並且可能會以一般的軟體應用形式運行,通常執行效率比 Type 1 來得低。常見作業系統層級的軟體類似於 VMWare、Vritual Box Hypervisor 軟體。
KVM (Kernel-based Virtual Machine) 是一種 Linux Kernel 支持的虛擬化技術,可以將 Linux Kernel 轉換成一個可用的 VMM 並將系統轉換為 Type 1 (bare-metal) 類型的 Hypervisor,使得你可以在 Linux 系統上運行多個隔離的虛擬環境 (VM)。KVM 一直是 Linux Kernel 設計的一部分,並且存在於主流的 Linux Kernel 版本中。因此,由於屬於 Linux Kernel 支持功能的一部分,通常可以使用接近原生系統的相應執行效能處理對應的 I/O 操作。
crosvm
crosvm 為 Google 的一項開源專案 (Chrome OS Virtual Machine Monitor),用於 Chrome OS 執行虛擬化機制的操作,基於 Linux KVM Hypervisor 實現虛擬化技術,並且用於 Android、Chrome OS 為基礎的系統中。與 QEMU 相比,它並不直接模擬實際的硬體裝置,反之,它採用了 Linux 支持的半虛擬化的裝置標準 (virtio) 來模擬虛擬機中相關的裝置。Firecracker paper 中具體提到了實作中採用了以 crosvm 作為基礎核心背景修改。
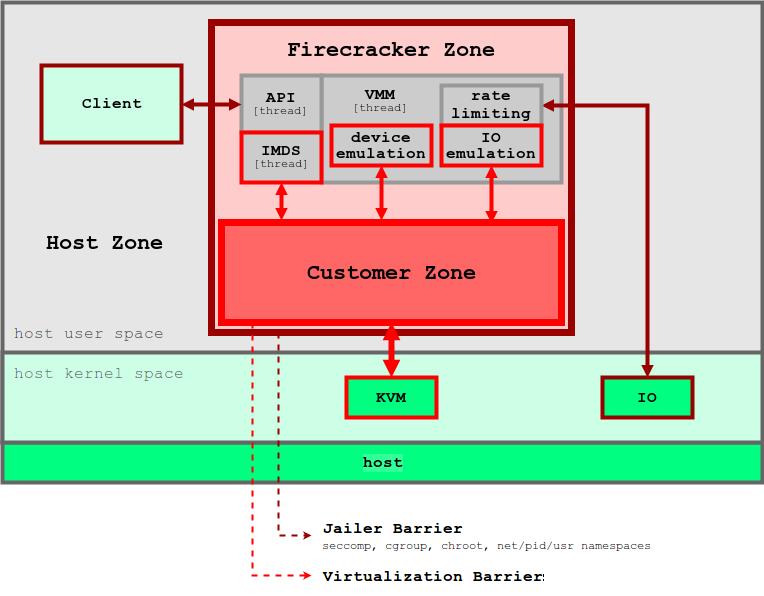
Cgroup (Control Group)
cgroup 是 Linux Kernel 一項支持的功能,主要可以用來限制運行在容器執行環境中的資源使用 (例如:CPU、Memory 和磁碟讀取寫入等)。cgroup 同時也被大量運用在 Linux container 的技術中,例如:Kubernetes、Docker 等。
在 Firecracker 中,提及了基於不信任 Guest OS 對於資源控制的行為。這是由於 Guest OS 屬於客戶控制的一部分,並無法預期其是否能依照合理的使用行為運行,因此,Firecracker 也採用了 Linux 本身支持的功能及 cgroup 等機制,限制了 VMM 和各個虛擬機器總體可用的資源。
Seccomp
seccomp 是 Linux Kernel 支持的一項功能,用來限制在容器中運行的 process 可以呼叫的系統方法 (syscall)。可以想像就像是允許使用特定 Linux function 的白名單,在 process 的直接階段僅允許特定系統呼叫操作。
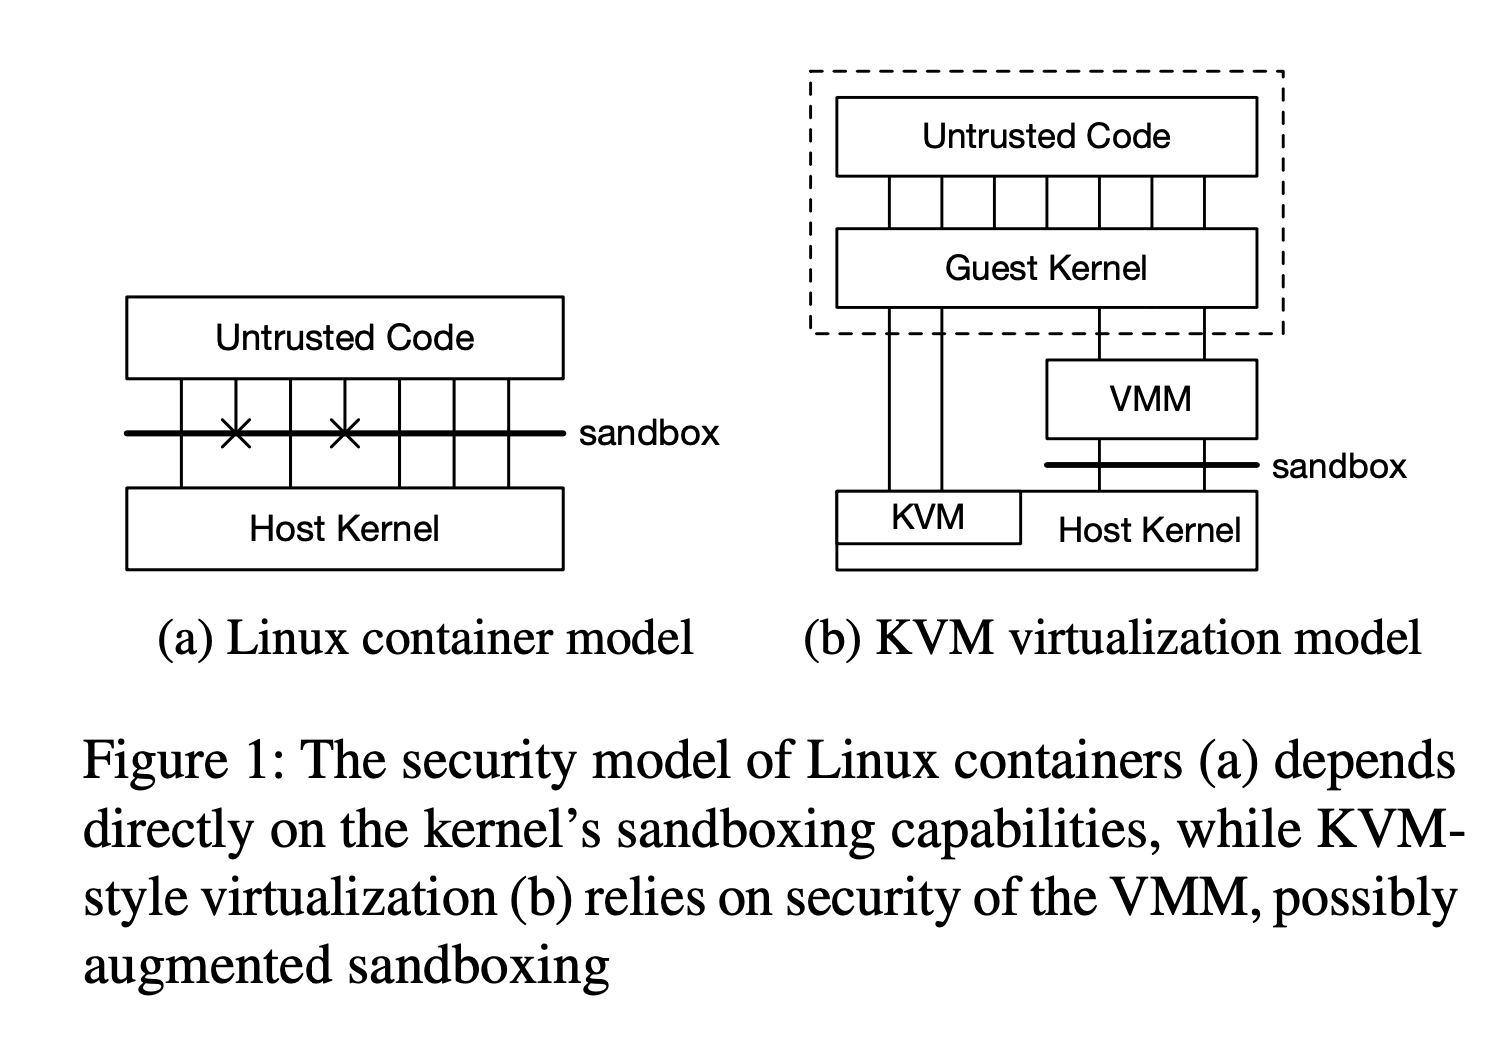
Linux container: Linux Kernel 本身支持的容器化技術,使 Linux process 存在於獨立的執行環境 (namespaces),並達到 process-level 的隔離,包含 user IDs (uids), process IDs (pids) 及 network interface,並且能夠利用 chroot 機制隔離執行的檔案系統。同時,利用 seccomp-bpf 更可以達到 process 執行系統呼叫的限制 (syscall)。在相關的研究中,一般啟動 Ubuntu Linux (15.04) 版本的安裝需要 224 syscalls 及 52 個獨立的 ioctl 操作。
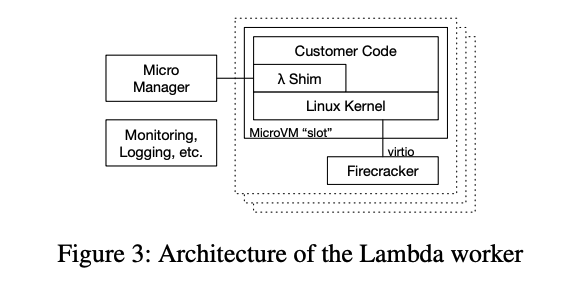
Our other philosophy in implementing Firecracker was to rely on components built into Linux rather than re-implementing our own, where the Linux components offer the right features, performance, and design
在 Firecracker 中的硬體裝置涵括了限制配額的機制,包含可以限制 Disk IOPS (I/O Per Second)、PPS (Packets Per Second for network)。在 Firecracker 提供了使用 API 設定 microVM 可用的資源請求,包含 CPU、磁碟 I/O、網路吞吐等。